
Garage · RECEPTIONIST
Receptionist
For front-desk staff at a Pickovo garage who greet customers, open jobs, book appointments and check vehicles in.
All names, plates, phone numbers and figures in the screenshots are fictional test data (for example "QA Alpha Motors", "Rita Receptionist (Alpha)", plate "RAE 601 A"). They are not real customers.
A. Introduction
As the receptionist you are the garage's front door. Every vehicle that comes in passes through you, and you are usually the person the customer talks to.
Your main responsibilities in Pickovo:
- Register walk-in customers and their vehicles, and keep that register clean (correct details, merge duplicates).
- Open new jobs (work orders) for walk-in customers and for vehicles already on your company's account.
- Manage appointments: confirm bookings that car owners make in the Pickovo mobile app, book appointments yourself, change times and cancel.
- Check vehicles in when they arrive: record odometer, fuel level and visible damage. This accepts the job onto the workshop board.
- Issue gate passes when a vehicle or item leaves the premises.
- Produce the Daily Report at the end of the day, and follow the workshop's numbers in the reports.
- Record customer complaints, take feedback at handover, and reply to owners' public reviews.
What you cannot do (by default): move a job past check-in (diagnosis, repair, quality check, closing belong to the workshop), assign mechanics after a job has been accepted, see invoices, record payments, manage stock, or change garage settings and staff.
About permissions. This guide describes the default access for a receptionist. Your garage admin can switch individual permissions on or off for the Receptionist role under Settings → Roles. If you see more or fewer menu items than described here, your garage has changed the defaults.
B. Getting started
Signing in
- Open https://fleet.heptadev.com/en/login in your browser. Use
/fr/loginfor French or/rw/loginfor Kinyarwanda, or tap EN / FR / RW at the top right of the page. - In Email or Phone, enter the email address or phone number your garage admin registered for you.
- Enter your Password. Tap the eye icon to show what you typed.
- Click Log in.
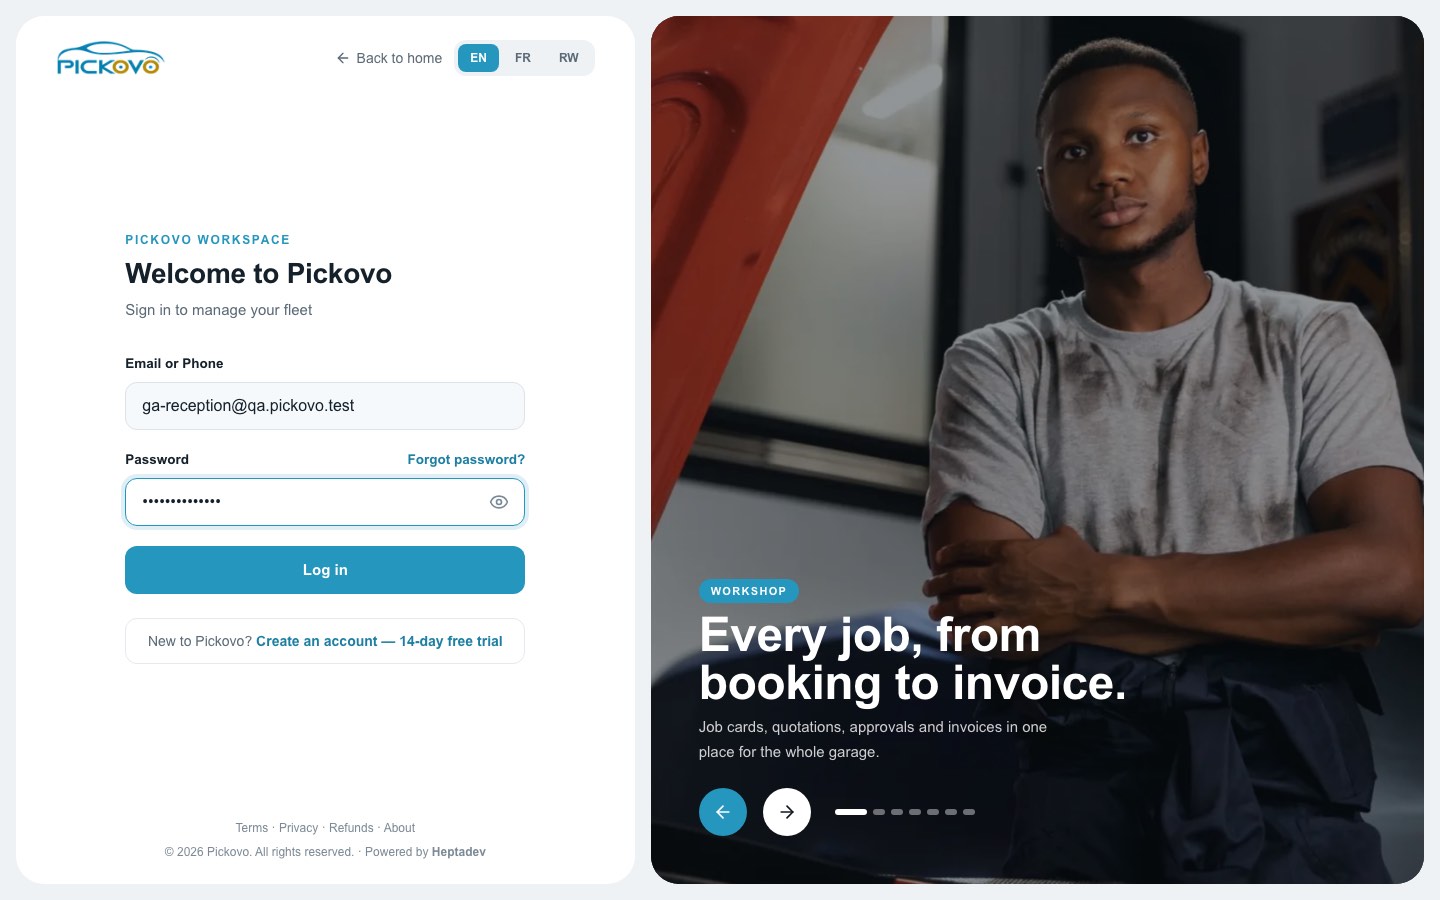
- Forgot password? (above the password box) sends you a reset link.
- If two-factor authentication is turned on for your account, Pickovo asks for the 6-digit code from your authenticator app after your password.
- After 10 wrong passwords in 15 minutes, sign-in for that account is paused. Wait 15 minutes before trying again, or use Forgot password?.
- "Create an account, 14-day free trial" is for new businesses, not for staff. Your account is created by your garage admin.
Your dashboard
After sign-in you land on the Receptionist Dashboard.
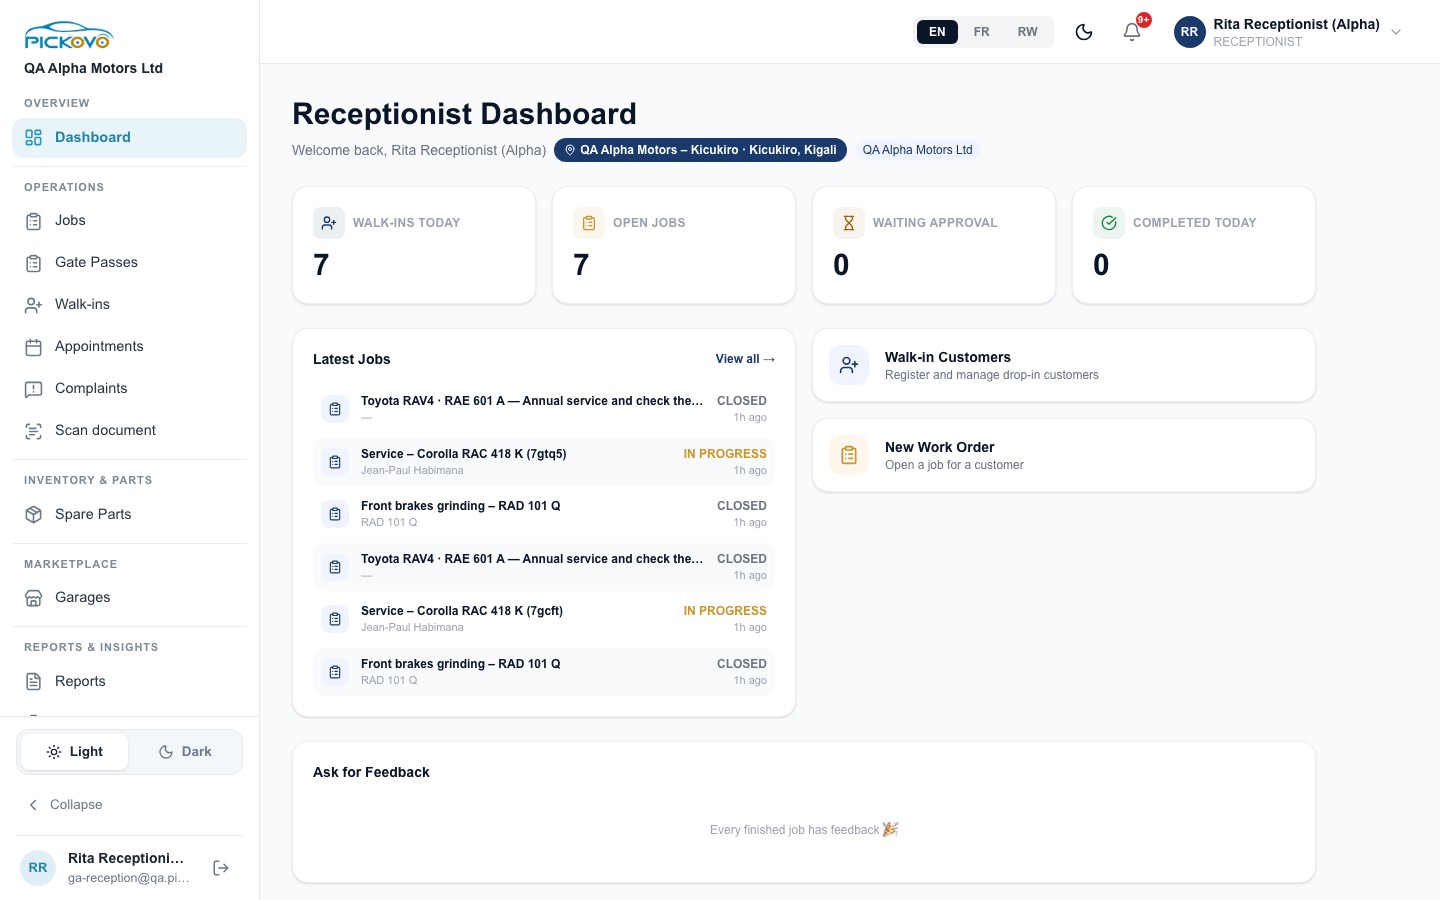
| Area | What it shows |
|---|---|
| Header | Your name, your garage branch (e.g. "QA Alpha Motors – Kicukiro · Kicukiro, Kigali") and your company. |
| Walk-ins today | Walk-in customers registered at your garage since midnight. |
| Open jobs | Jobs currently active at your garage. |
| Waiting approval | Jobs waiting for the customer or fleet company to approve a quotation. |
| Completed today | Jobs marked Completed today. |
| Latest Jobs | The six most recent jobs with their status and how long ago they were opened. View all → opens the Jobs page. |
| Walk-in Customers / New Work Order | Shortcuts to the walk-in register and to the new-job form. |
| Ask for Feedback | Finished walk-in jobs where nobody has recorded the customer's feedback yet. Click one to open the job and record it. "Every finished job has feedback" means you are up to date. |
Navigation overview
Left sidebar (as seen in the screenshots):
- Overview: Dashboard
- Operations: Jobs, Gate Passes, Walk-ins, Appointments, Complaints, Scan document
- Inventory & Parts: Spare Parts (the spare-parts marketplace)
- Marketplace: Garages (the marketplace inbox)
- Reports & Insights: Reports, Workshop Reports
- Settings (your own profile)
- At the bottom: the Light / Dark switch, Collapse (shrinks the sidebar to icons; point at an icon to see its name), and your name and email with the log-out button.
Top bar: language switch (EN / FR / RW), the moon icon (dark/light theme), the bell (notifications, with a red badge for unread ones) and your name and role. Click your name to open your account menu.
Notifications
Click the bell to open Notifications. You are told when jobs change stage (accepted, in quality check, ready for collection, closed) and about other events at your garage.
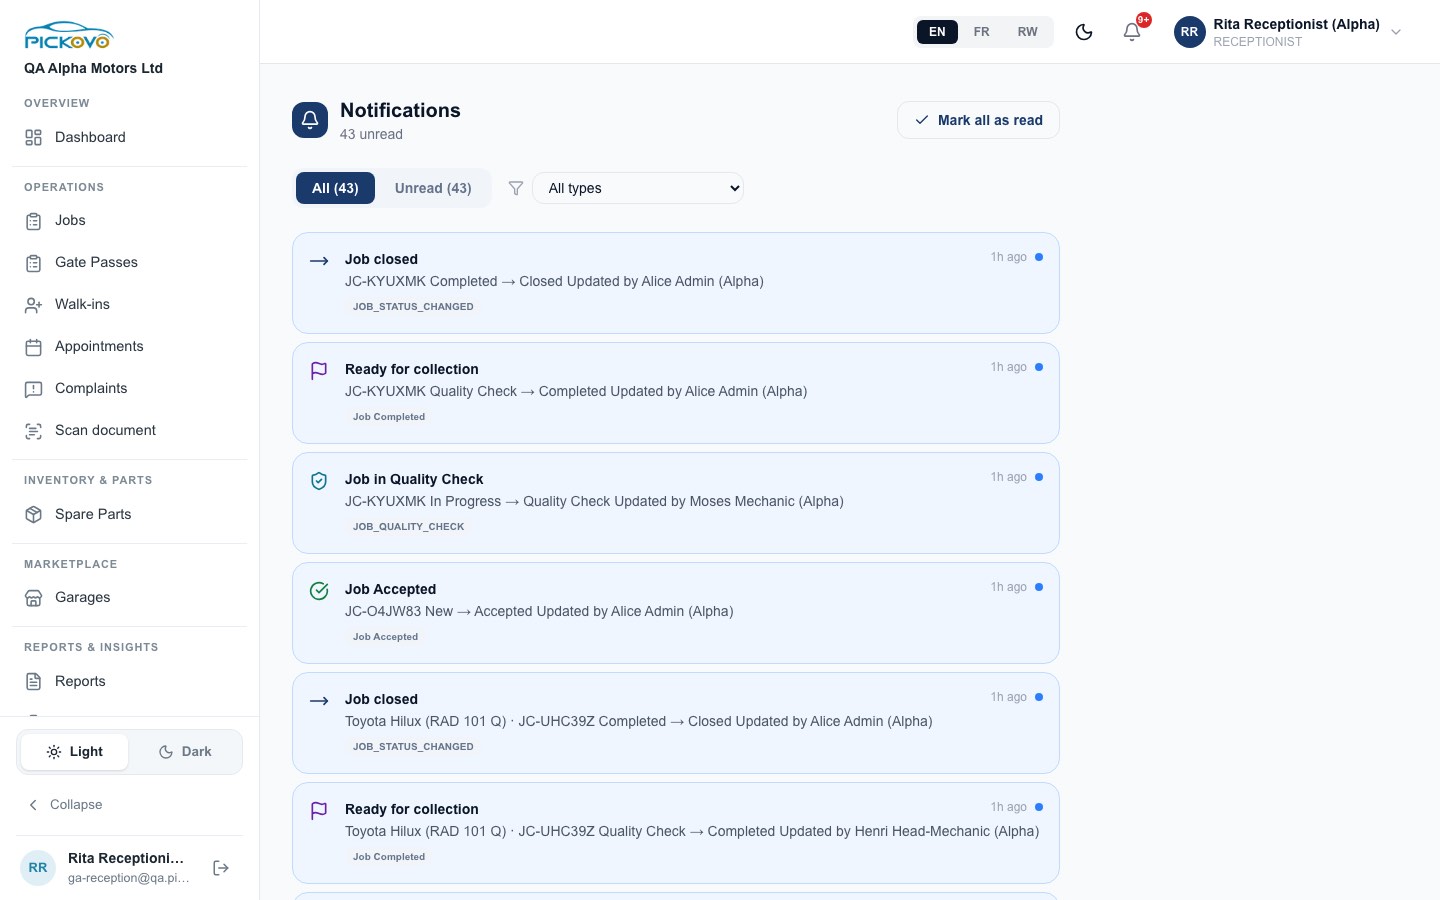
- All / Unread tabs, and an All types drop-down to filter by kind of notification.
- Mark all as read clears the unread count.
- A blue dot marks an unread notification.
C. Features
C.1 Walk-in customers
Purpose: keep the register of customers who come to the counter without a fleet account, with their vehicles, so you can open jobs for them quickly.
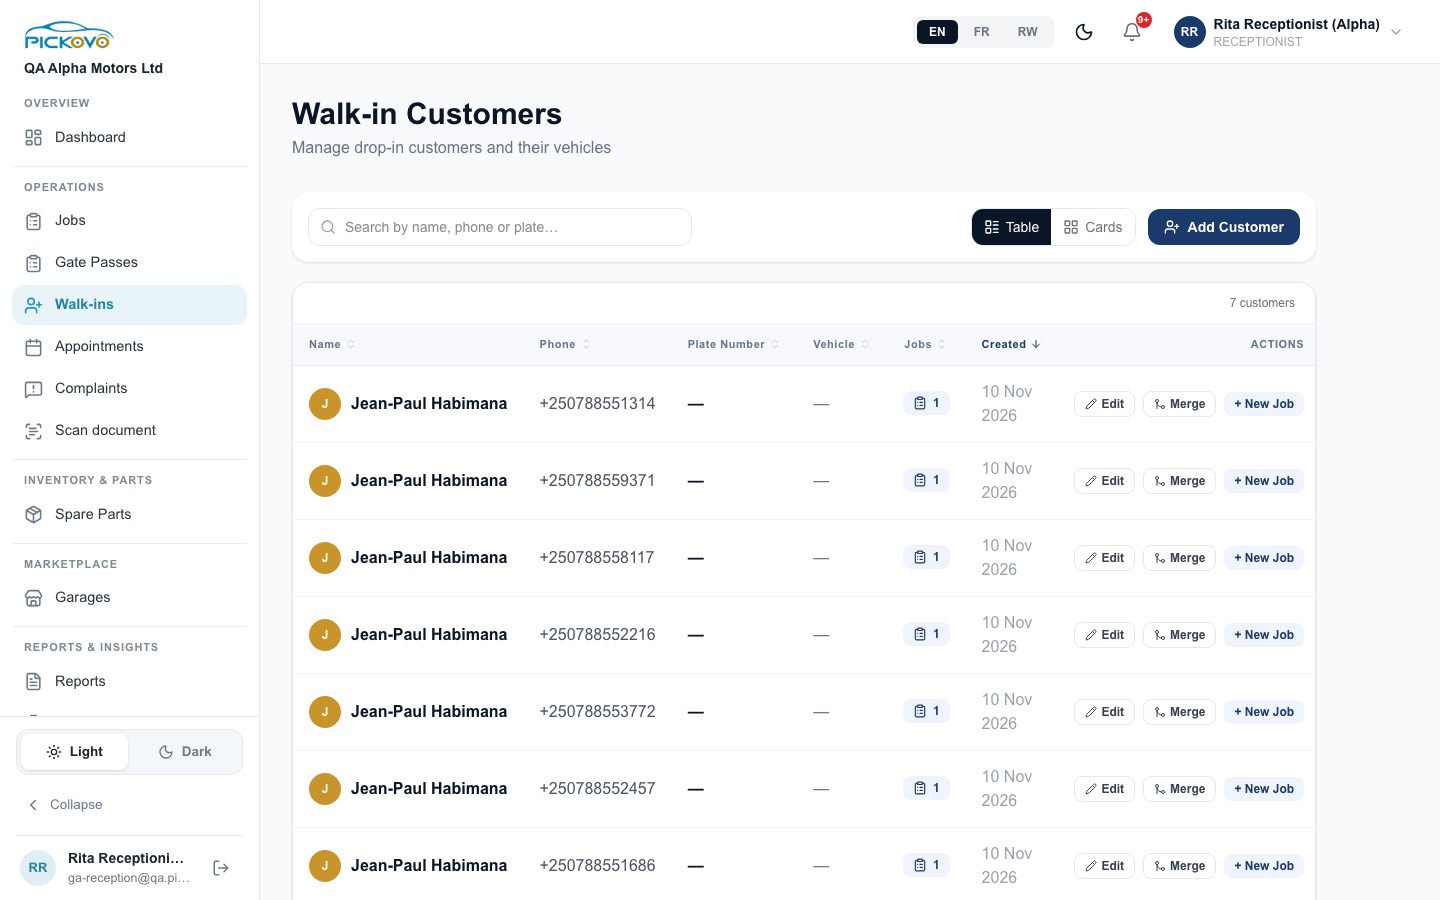
Add a customer
- Open Walk-ins in the sidebar.
- Click Add Customer.
- Fill in Full Name and Phone (both required). Email is optional.
- Under Vehicle, enter Plate Number, Year, Make, Model and, if you wish, Vehicle Type (leave "Work it out automatically" if unsure). Use Add another vehicle when the customer brings more than one; the first is marked "main". Remove deletes a vehicle row.
- Add any Notes, then click Save Customer.
If another customer already has that phone number, Pickovo warns you: A customer named "…" already has this phone number. Click Save anyway only if they really are different people.
Buttons and columns
| Item | What it does |
|---|---|
| Search box | Finds customers by name, phone or plate. |
| Table / Cards | Switches between a list and a card view. |
| Jobs (clipboard number) | Shows that customer's jobs and the stage each one is at. |
| Edit | Corrects the customer's details. The change applies everywhere, including past jobs, and is recorded in the activity log. |
| Merge | Folds a duplicate record into this one. Pick the duplicate, then click Merge. Its jobs, vehicles and feedback move across and the duplicate is removed. This cannot be undone. |
| + New Job | Opens the new-job form with this customer already selected. |
Restrictions: needs the walkIns.manage permission (on by default). Customers cannot be deleted from this page; use Merge for duplicates.
C.2 Jobs board
Purpose: see every job at your garage and where it stands.
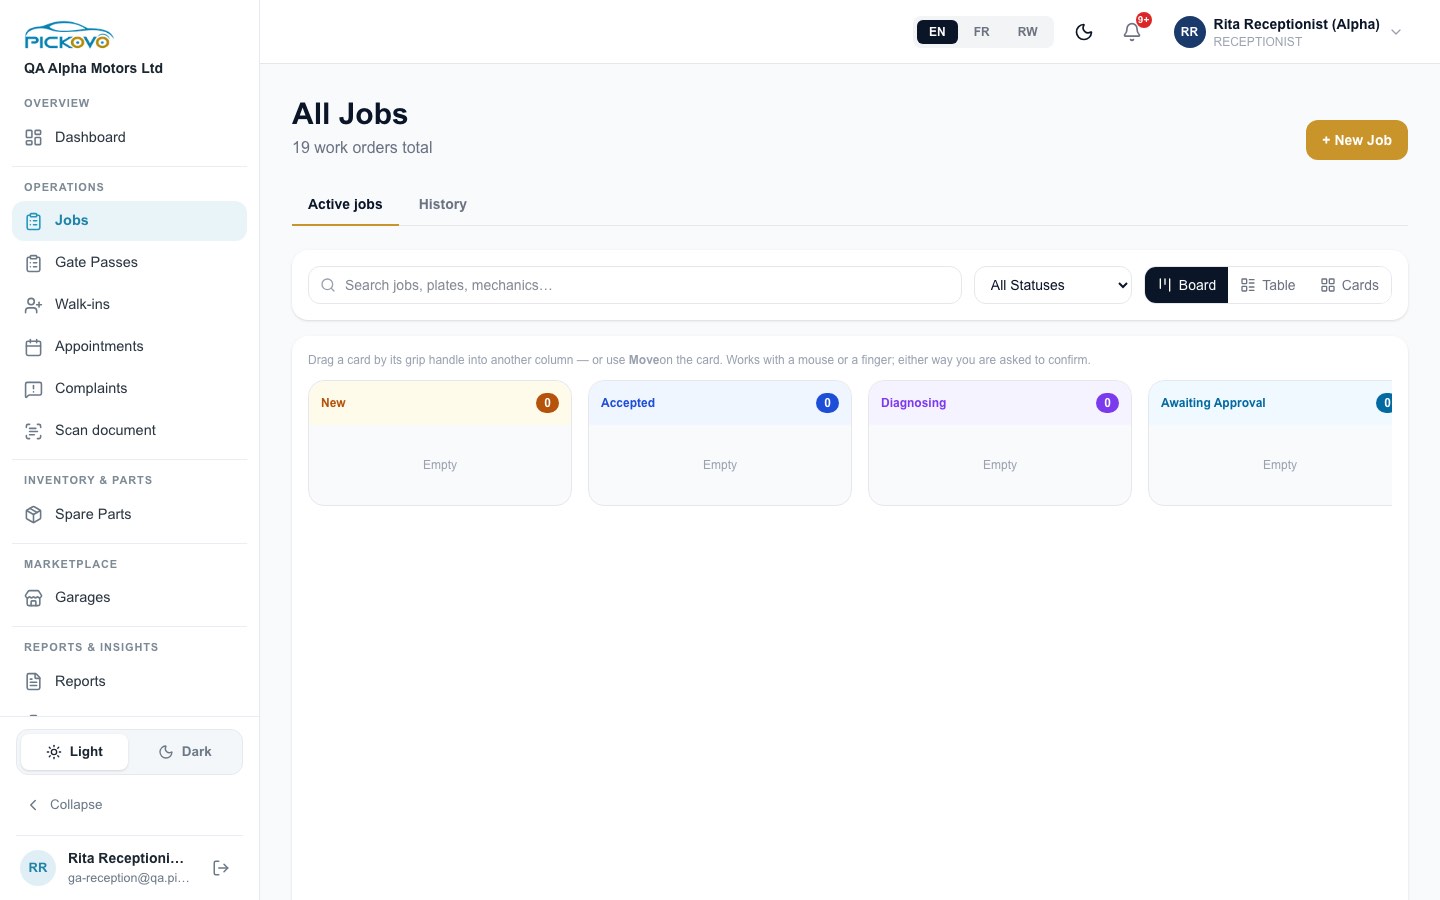
- Active jobs / History tabs. History lists finished jobs.
- Search by job, plate or mechanic, and filter with All Statuses.
- Board / Table / Cards change the layout. The board has one column per stage (New, Accepted, Diagnosing, Awaiting Approval, and further to the right).
- + New Job opens the new-job form (see C.3).
- Click any job to open its job card (see C.4).
Moving jobs: you may drag a card (by its grip handle), or use Move on the card, only from New to Accepted or to Declined. Pickovo asks you to confirm. Every later move belongs to the workshop. For a vehicle that is physically arriving, use Accept Job on the job card instead, because it also records the check-in details.
C.3 Creating a new job (work order)
Purpose: open a job card for a vehicle that needs work.
- Click + New Job (Jobs page), New Work Order (dashboard) or + New Job on a walk-in row.
- Choose the Customer Type:
- Fleet Vehicle, pick a vehicle already registered on your company's account from the list.
- Walk-in Customer, type a name, phone or plate in Search by name, phone or plate… and pick the customer. If nobody matches, click Add this customer, enter name, phone and vehicle(s), then Save & use this customer. If the customer has several vehicles, choose the right one.
- The Garage is filled in for you.
- Enter a Job Title (required), for example "Front brakes grinding", and a Description.
- Set Priority (Normal or Urgent) and, if agreed, a Deadline. The deadline cannot be in the past.
- Optionally set Booking Date & Time and a Mechanic. Pickovo checks the mechanic's schedule and warns you if they are already booked at that time.
- Click Create Job.
Expected outcome: the job appears in the New column of the board with status Pending. If you chose a mechanic, they are notified.
Possible errors: a booked time that is already full is refused ("slot taken"). Choose another time.
C.4 The job card and vehicle check-in
Purpose: each job has its own page, the job card. This is where you check a vehicle in and follow its progress.
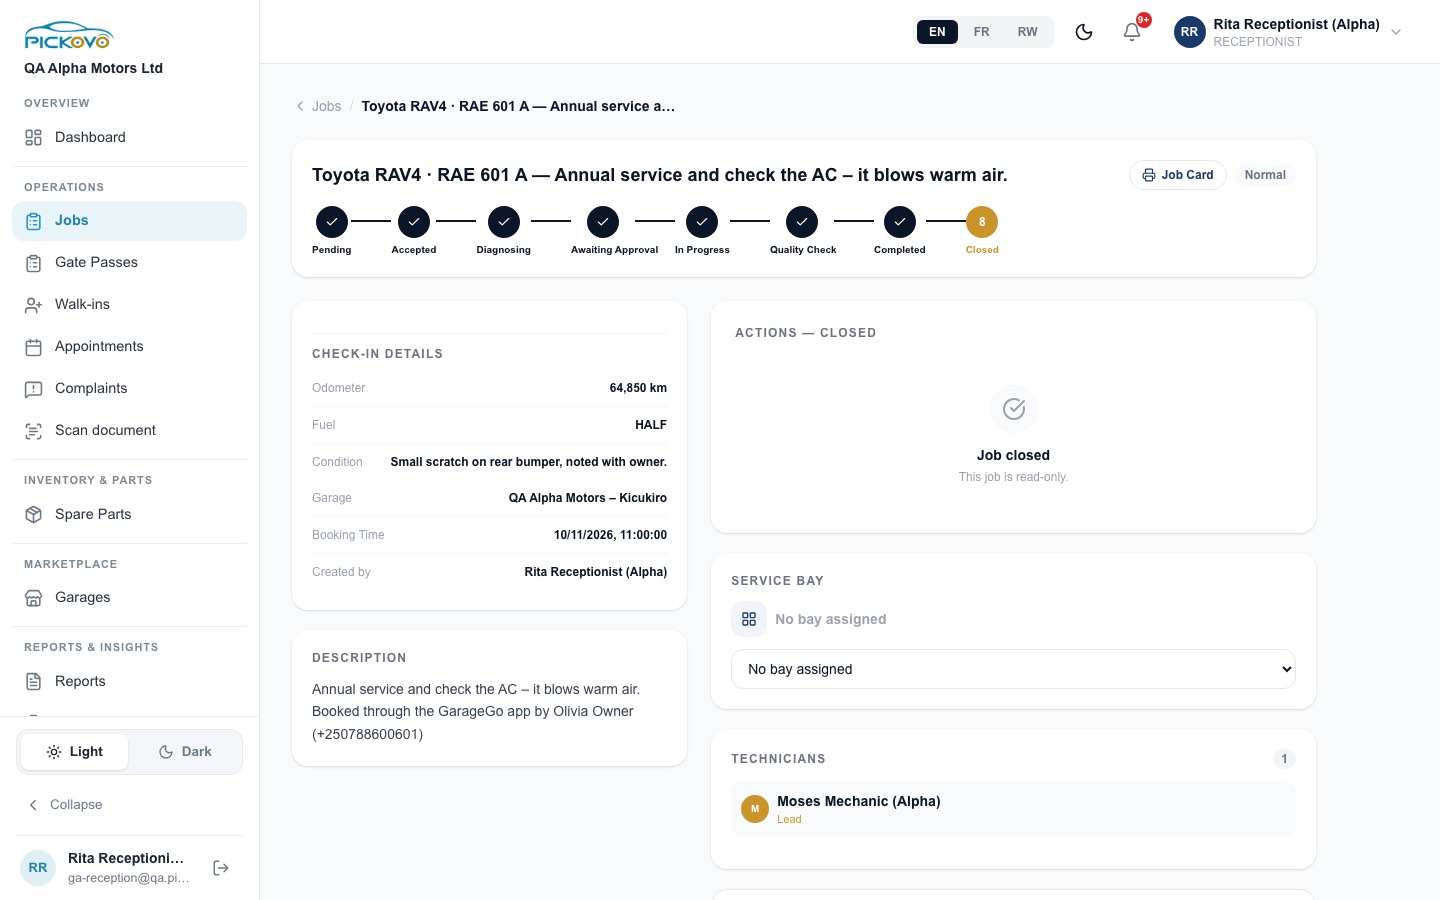
The stage timeline at the top runs Pending → Accepted → Diagnosing → Awaiting Approval → In Progress → Quality Check → Completed → Closed.
Check a vehicle in (accept the job)
- Open a job that is still Pending.
- In the Actions panel, click Accept Job. The Check In Vehicle window opens. All fields are optional:
- Arrival date and Time. Change these if the car actually arrived earlier, for example on Saturday when you are checking it in on Monday. Reports use this date. It cannot be in the future.
- Odometer (km)
- Fuel level (Empty, 1/4, 1/2, 3/4, Full, or Not recorded)
- Condition notes: existing scratches, dents, dashboard warning lights.
- Click Check In.
Expected outcome: the job moves to Accepted and the Check-in details box on the job card shows what you recorded. A job can be checked in only once.
Decline a job: on a Pending job, click Decline Job and confirm. The decision is final.
Other things you can do on a job card
| Control | Who/when |
|---|---|
| Job Card (printer icon) | Opens a printable job card. Available at any stage. |
| Edit | Corrects title, description, priority, deadline or booking time while the job is open (not Closed or Declined). You can change the lead mechanic only while the job is still Pending. |
| Service bay | Choose which bay the car is in. |
| Notes | Internal notes (never shown to the customer) and customer-facing notes. |
| Customer feedback | Record the customer's rating and comments at handover. |
| Warranty | Record a warranty once the job is completed. |
| Customer progress link | Create link and Copy a private, expiring link the customer can use to follow the job. It shows progress only, with no costs or internal notes. |
| Tag someone | Type @ to tag a colleague; they are notified. |
When a job is Closed the Actions panel shows "Job closed, This job is read-only".
Restrictions: from Accepted onwards you can follow the job but not move it. Diagnosis, quotations, starting work, quality check, completion and closing are done by the mechanics, head mechanic or garage admin.
C.5 Appointments (bookings)
Purpose: one place for bookings that car owners make in the Pickovo mobile app and appointments you book at the desk.
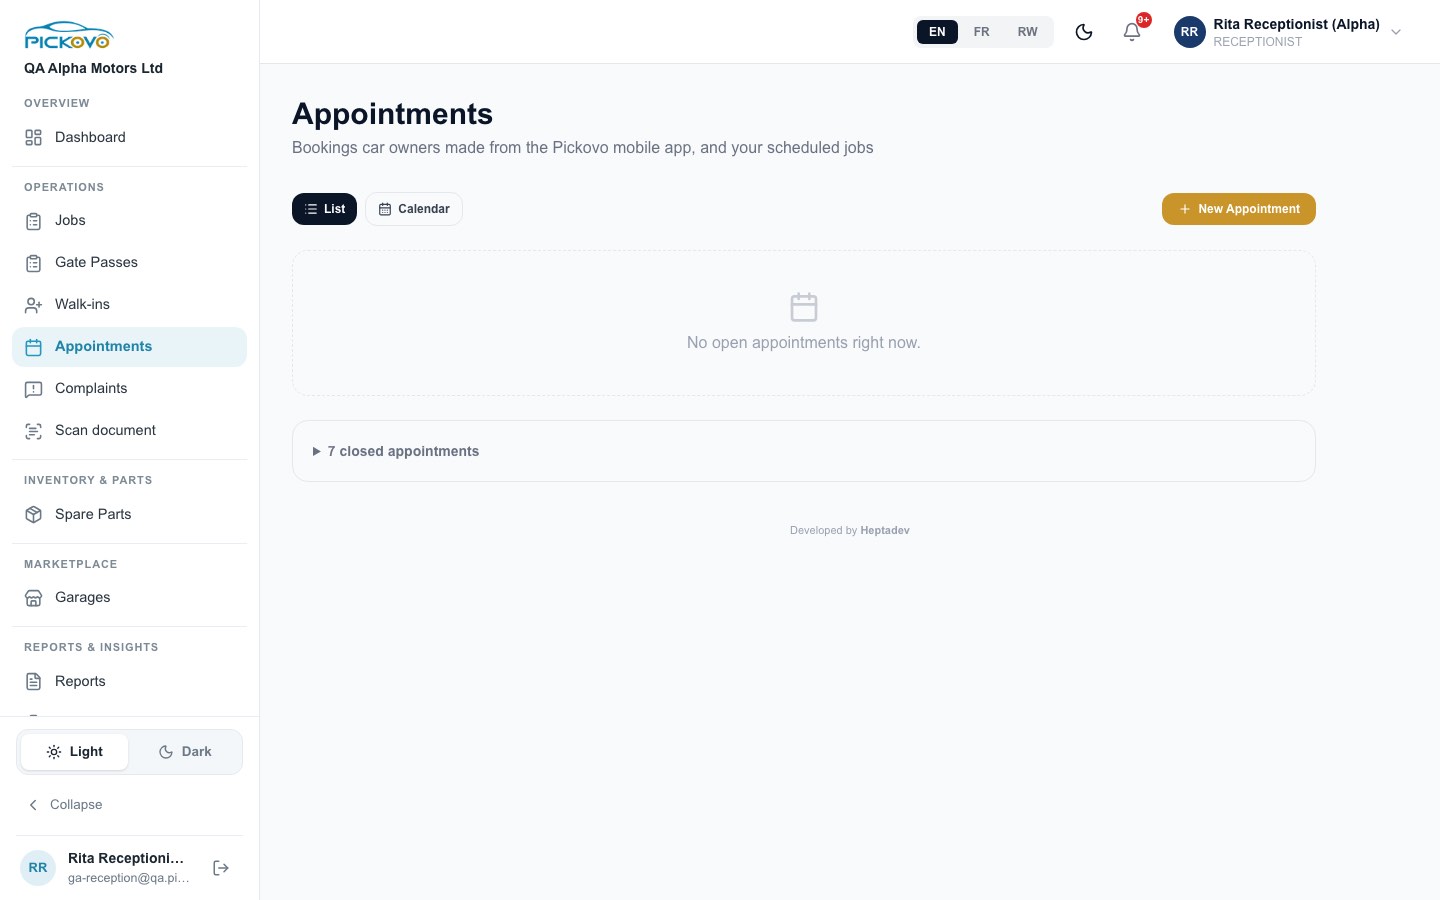
- List / Calendar switch the view. The calendar shows booked jobs and owner bookings for roughly three months back to six months ahead, and can be filtered by mechanic.
- Scheduled jobs are appointments booked at the desk. Each has Edit and, while still Pending, Cancel.
- From the Pickovo app are owners' bookings. Each shows the status, time, vehicle, owner name and phone (tap to call), and the mechanic they asked for, if any.
- N closed appointments (at the bottom) expands to show completed and cancelled ones.
Confirm an owner's booking
- Find the booking with status Requested.
- Click Confirm.
Pickovo opens a job card for the booked time, so it holds the slot on the calendar and the board, and the owner is told the booking is confirmed. The button then becomes Open job card. When the car arrives, check it in on that job card (C.4).
Change the time: click Change time, pick a new date and time, then click Save. The time must be in the future and the slot must have room. The owner is notified.
Cancel: click Cancel on the booking. If it already has a Pending job card, that job is declined too.
Book an appointment yourself
- Click New Appointment.
- Under Appointment details, set Date & Time and Mechanic (both required). You are warned if the mechanic is already busy.
- Choose the customer and vehicle, enter a title and description, as in C.3.
- Click Book Appointment. You return to Appointments and the booking appears under Scheduled jobs.
Restrictions: once a booking has a job card, its stage follows the job card and you cannot move it from Appointments ("This booking has a job card: move it on the job card"). Closed bookings cannot be changed.
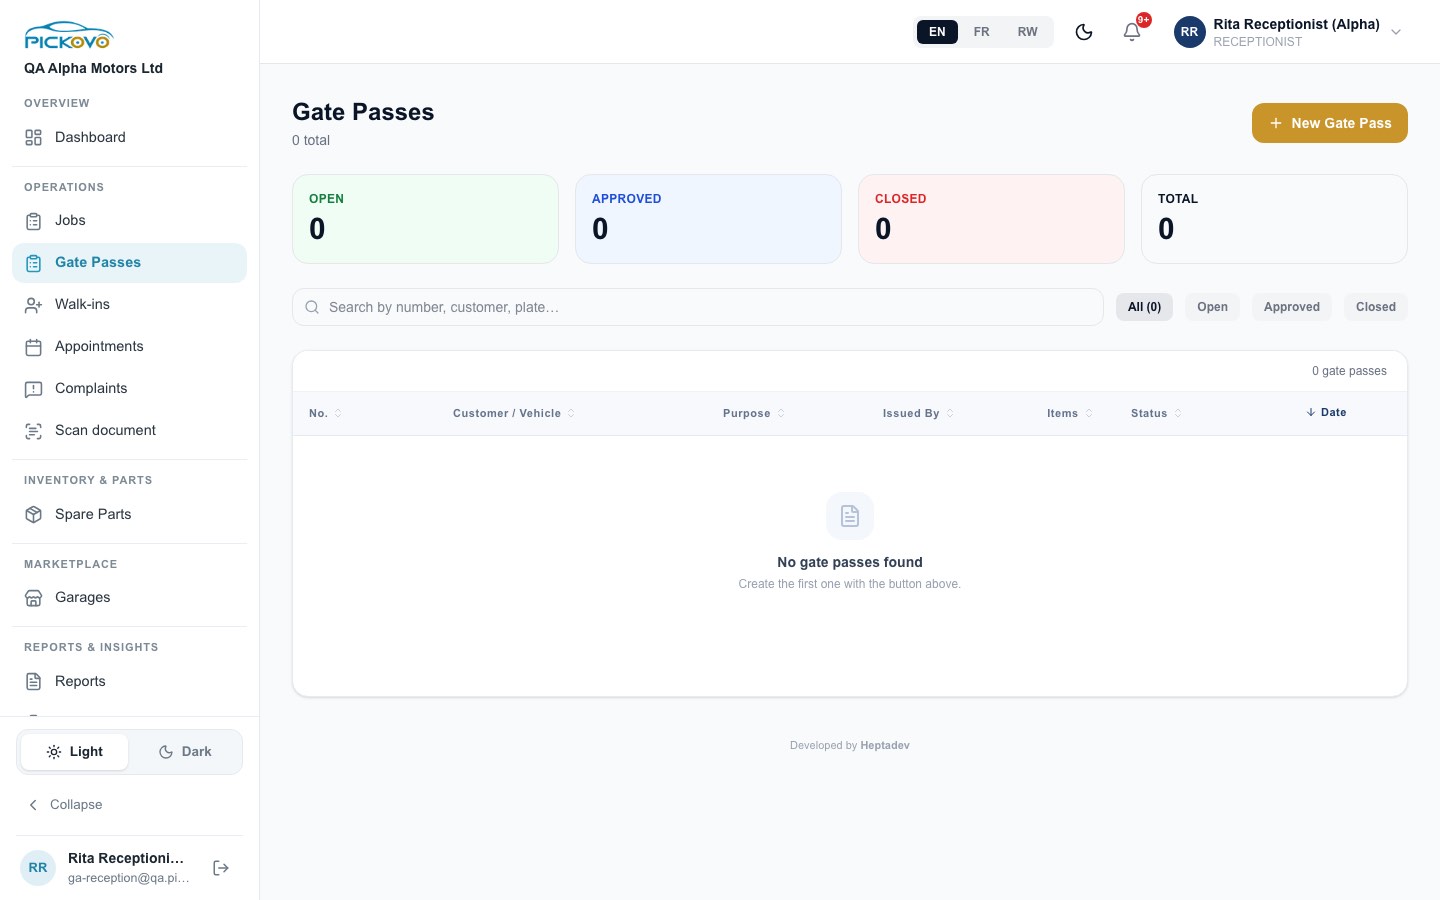
C.6 Gate passes
Purpose: a signed record for anything leaving the premises: a vehicle after service, a test drive, a car going for external repair, a customer pickup, or items.
Create a gate pass
- Open Gate Passes and click New Gate Pass.
- Optionally Auto-fill from Job Card: search by job, customer or plate.
- Enter Customer Name and/or Vehicle Plate. At least one is required.
- Choose the Purpose: After Service, Test Drive, External Repair, Customer Pickup or Other. Other asks for a Purpose Note.
- Check Date & Time, Authorized By (supervisor) and Received By (driver or customer). Received By starts with your name.
- Optionally add Items / Parts (name, quantity, type such as Tool, Spare Part or Customer Belonging, and condition) and Notes.
- Save. Pickovo opens the new pass with status Open.
On the pass, click Print for a paper copy with signature lines for "Authorized By" and "Received By".
List tools: search by number, customer or plate; filter All / Open / Approved / Closed; sort by any column.
Restrictions: you can create and print passes. Approving and closing a pass is done by the garage admin.
C.7 Workshop Reports and the Daily Report
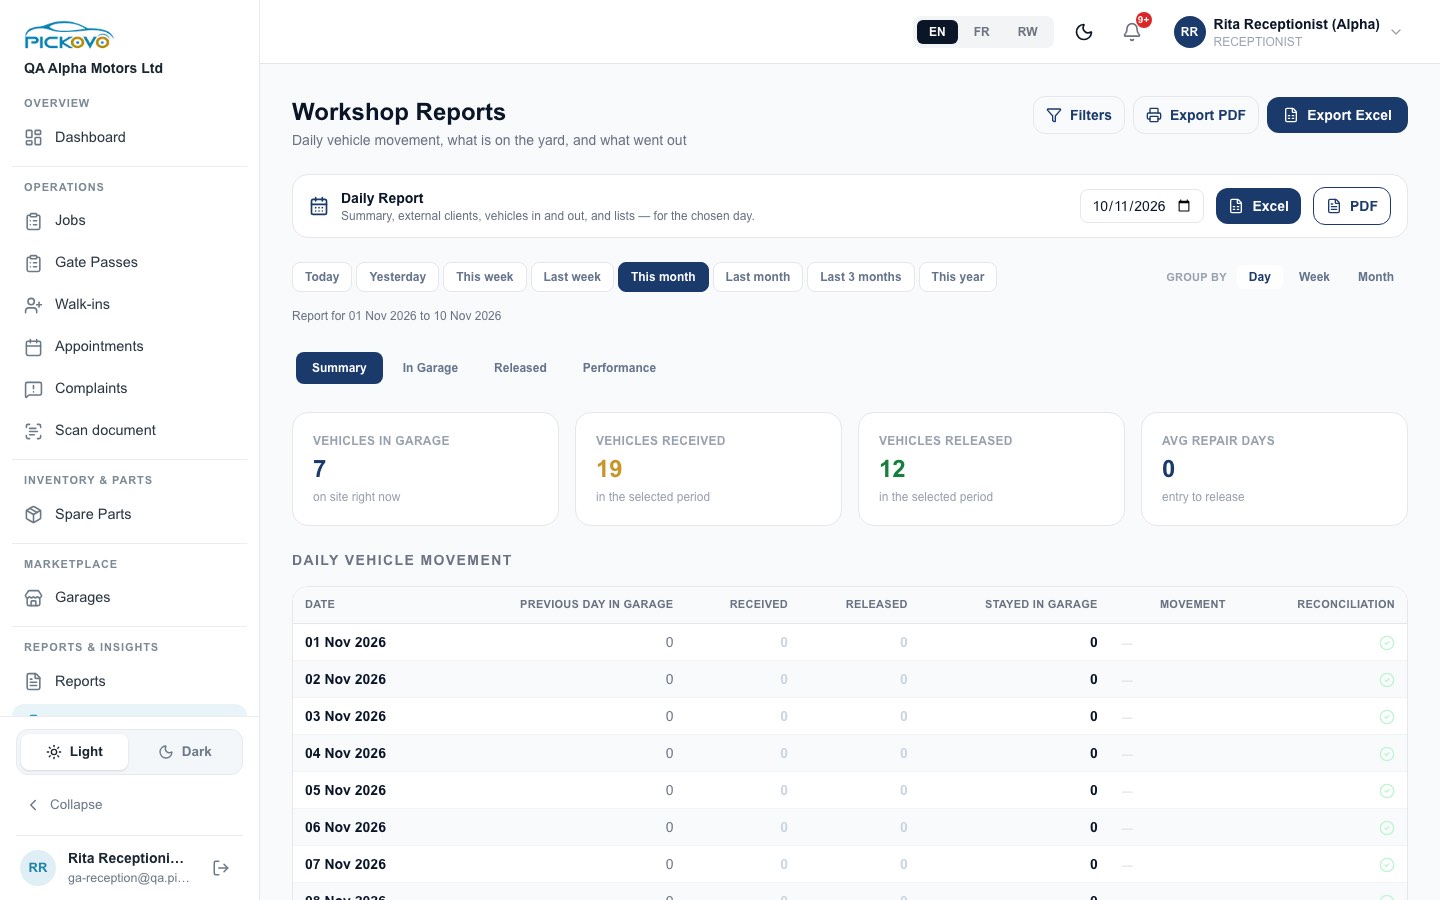
Purpose: the day-to-day view of vehicle movement, and the end-of-day document the front desk hands over.
Produce the Daily Report
- Open Workshop Reports.
- In the Daily Report bar, pick the date (today or earlier).
- Click Excel or PDF to download it. It contains a summary, external clients, vehicles in the garage, vehicles released and lists for that day.
The Daily Report includes client payment information. Treat the downloaded file as confidential (see section G).
Rest of the page
- Period buttons: Today, Yesterday, This week, Last week, This month, Last month, Last 3 months, This year. Group by Day / Week / Month changes the Summary table.
- Tabs: Summary (vehicles in garage, received, released, average repair days, and a daily vehicle-movement table with a reconciliation check), In Garage, Released, Performance. On Performance you can set the KPI targets.
- Filters narrows by dates, plate, client, service, status and technician.
- Export PDF prints the current view. Export Excel downloads it.
Restrictions: the Daily Report needs reports.daily and the page needs reports.operational, both on by default. Money columns and the External Clients tab are hidden unless your garage grants you reports.financial.
C.8 Garage Reports
Purpose: a performance overview of the garage.
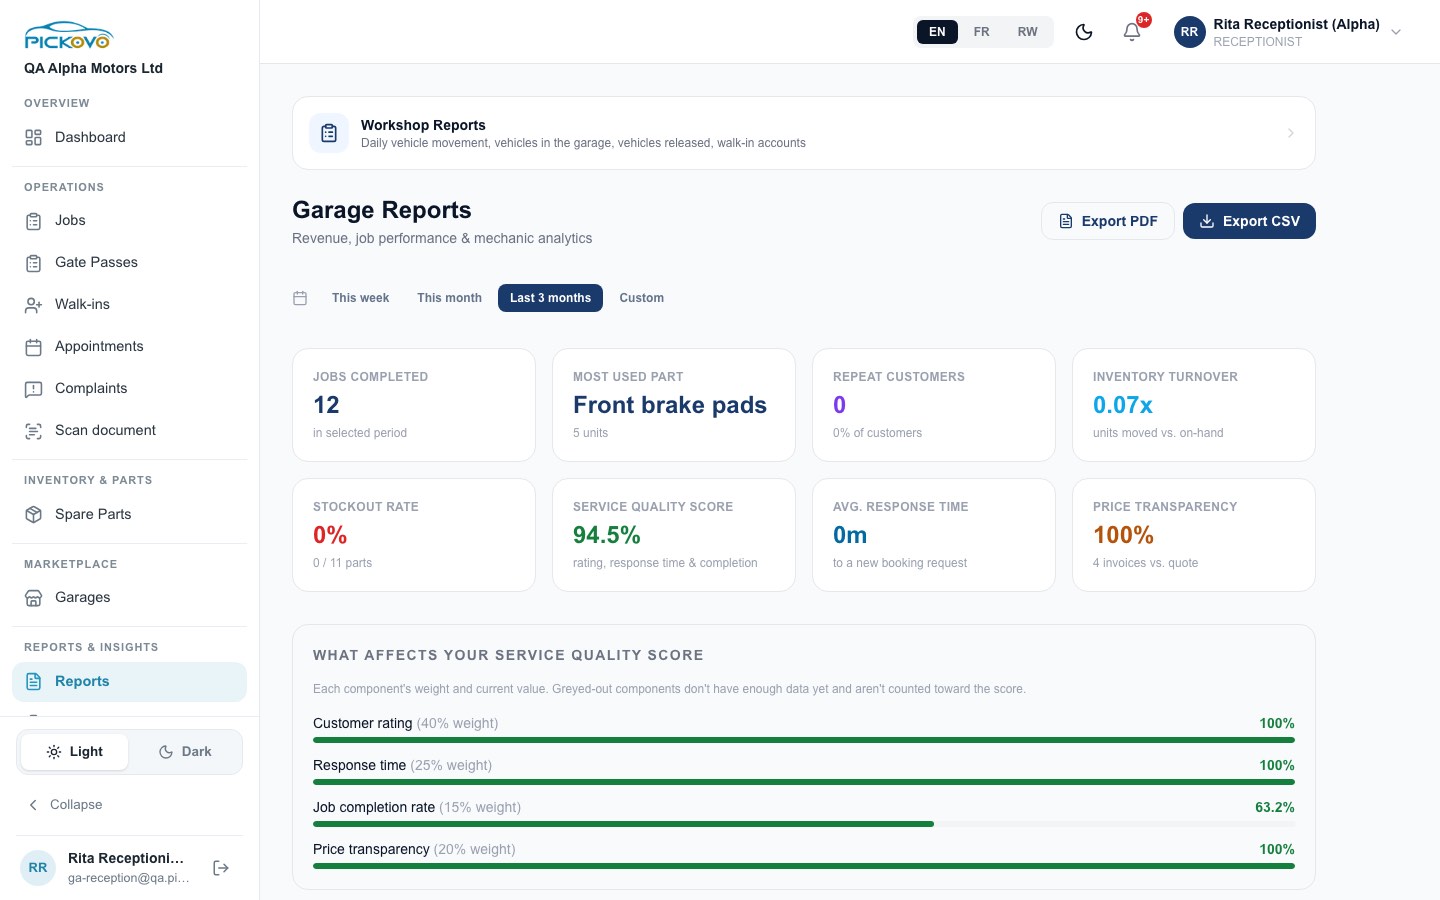
- The Workshop Reports card at the top links to C.7.
- Choose This week / This month / Last 3 months / Custom.
- Cards include jobs completed, most-used part, repeat customers, inventory turnover, stockout rate, service quality score, average response time to a new booking request, and price transparency (invoices compared with quotes).
- What affects your service quality score shows each component's weight and value. Greyed-out components do not yet have enough data.
- Export PDF and Export CSV export the report.
Restrictions: revenue figures are not shown to receptionists by default.
C.9 Complaints
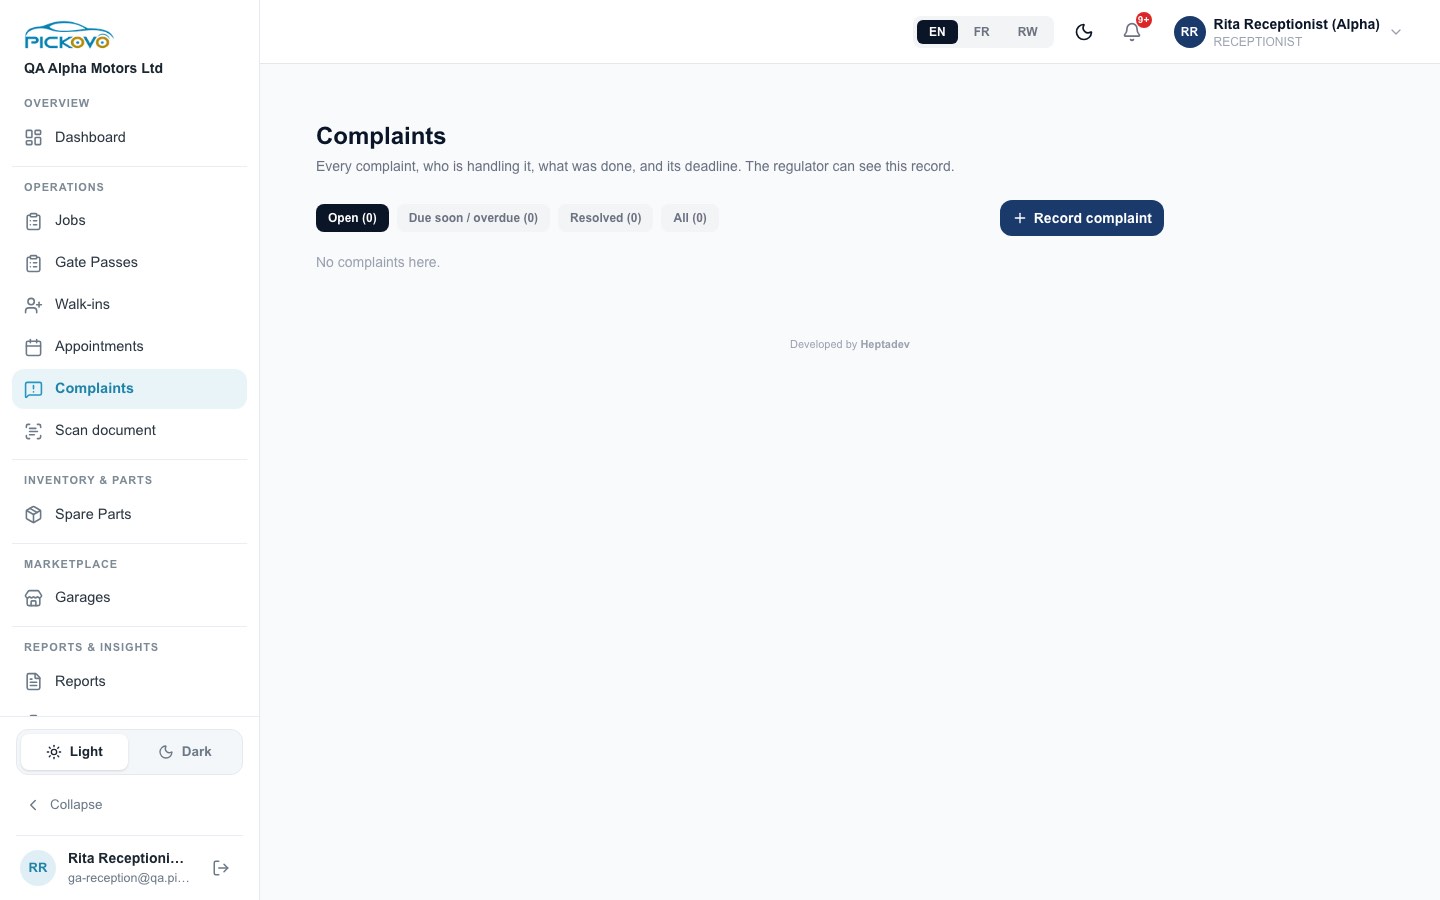
Purpose: a register of every customer complaint, who is handling it, what was done and the deadline. The regulator can see this record.
Record a complaint
- Click Record complaint.
- Fill in Customer name (required), Phone, Email, Category, Related job card (optional), Assign to (a colleague, optional) and Respond by. The default is 14 days.
- Describe it in What is the complaint? (required) and save.
On an existing complaint you can add follow-up notes to the Follow-up log, reassign it, change the due date, resolve it with a description of how it was resolved, and reopen a resolved one with a reason.
Restrictions: needs complaints.view (on by default).
C.10 Reviews
Purpose: see what car owners say about your garage and reply publicly. Owners can review once per finished job in the Pickovo app.
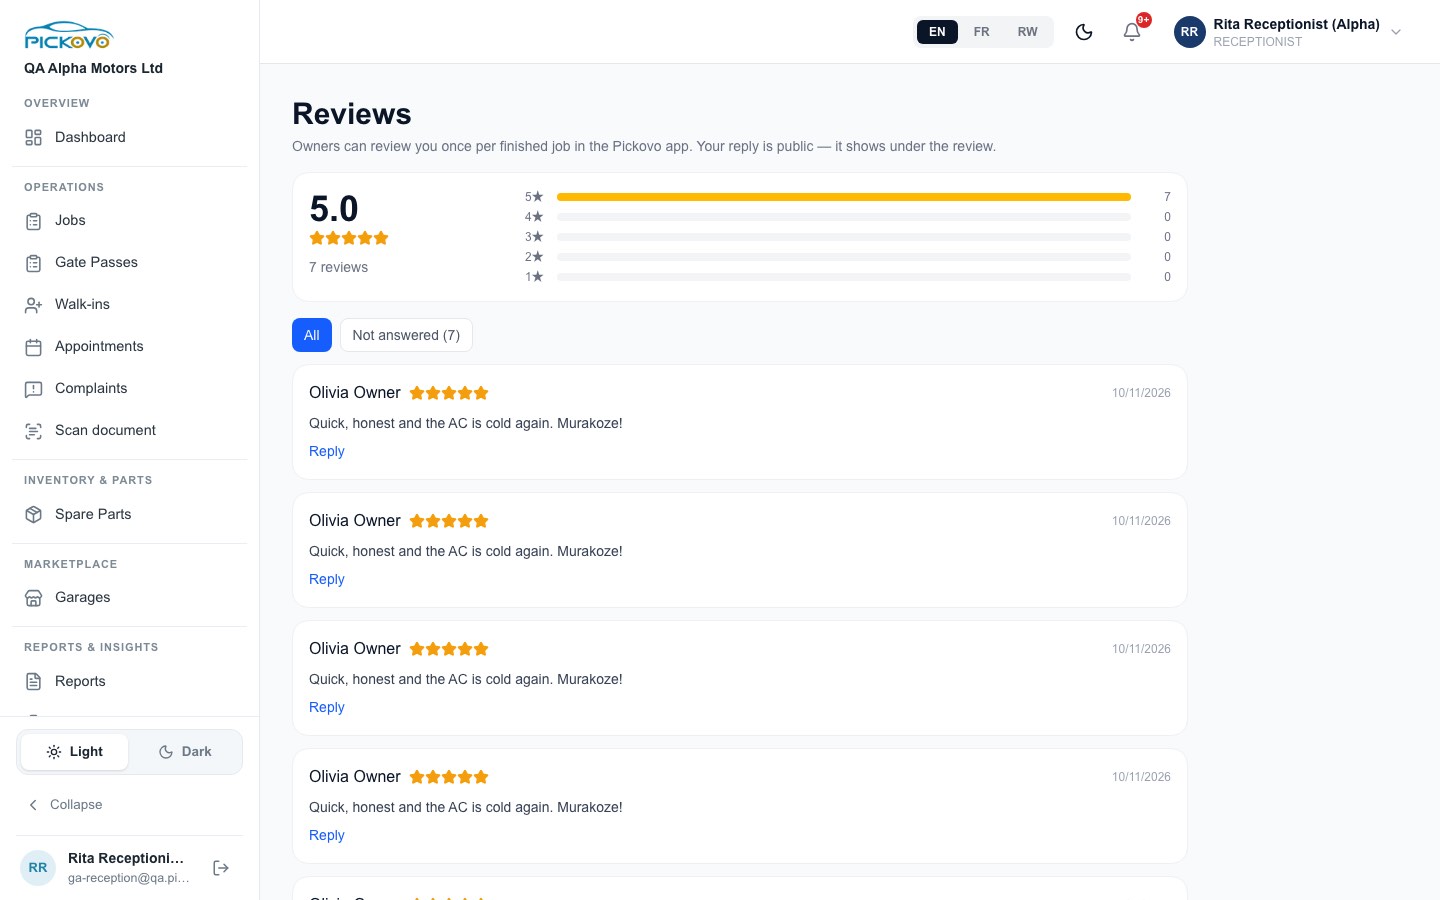
- Use All or Not answered (n) to find reviews that need a reply.
- Click Reply under a review, write your answer and click Publish reply. Keep it under 1,000 characters.
- Later you can Edit reply or Remove reply.
Your reply is public: everyone who sees the review can read it. Reviews has no sidebar link. Open it at /en/garage/reviews. The page works only if Pickovo has turned on Reviews for your garage. Replying is limited to the garage admin and the front desk.
C.11 Spare Parts marketplace
Purpose: find spare-parts shops and request parts from them.
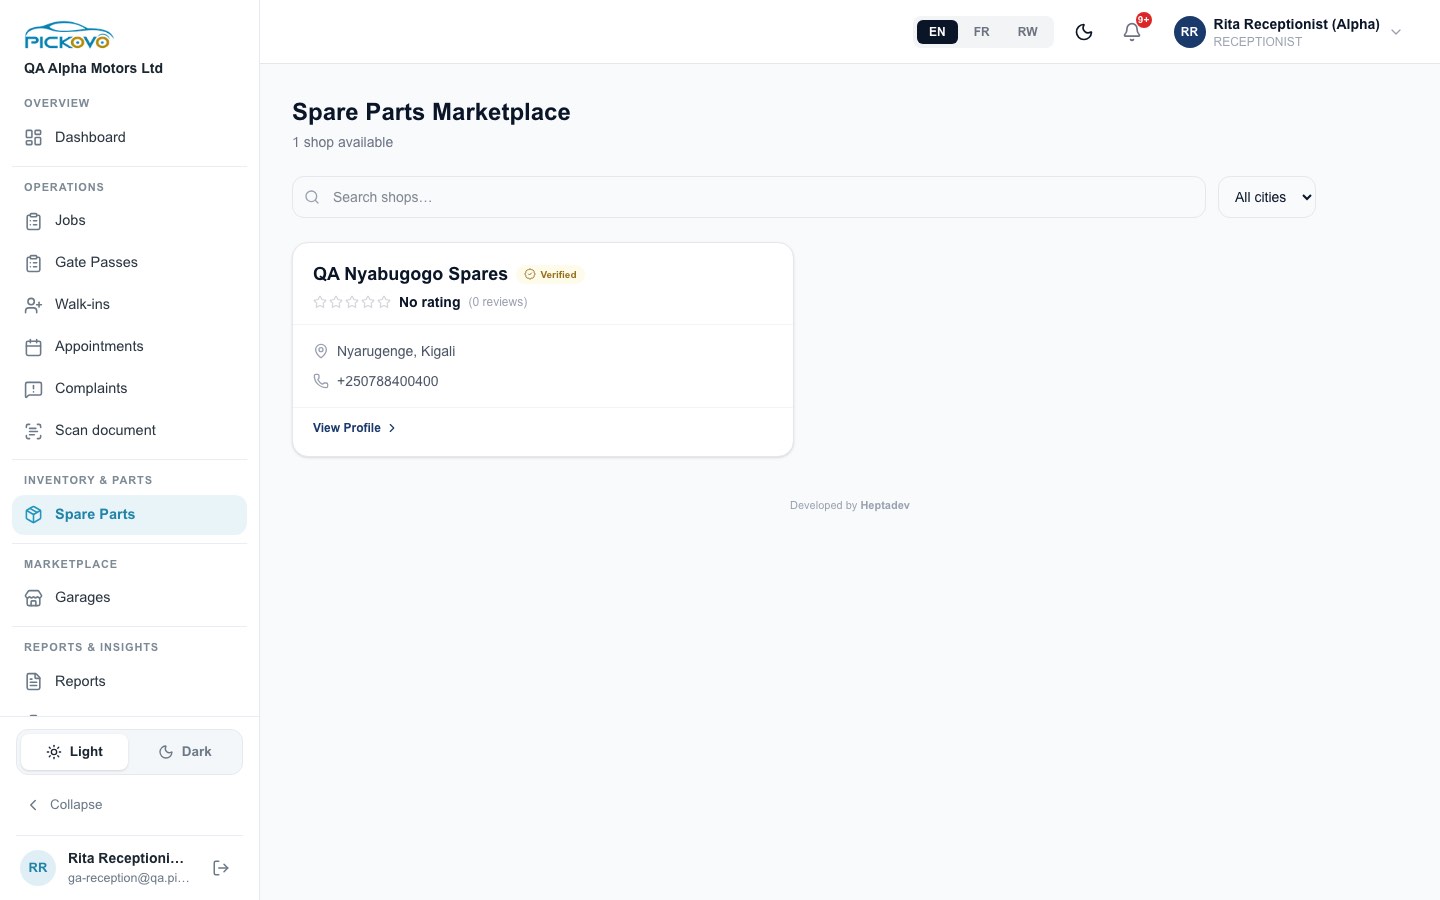
- Open Spare Parts. Search by shop name or filter by city.
- Click View Profile on a shop.
- If your garage has an accepted collaboration with that shop, use Request Parts: list each part and quantity, set Needed By, add Notes and click Send Request. You can also leave the shop a review.
- Without an accepted collaboration you see "You need an accepted collaboration to request parts from this shop".
C.12 Marketplace inbox (Garages)
Purpose: see collaboration requests from fleet companies and invitations from spare-parts shops.
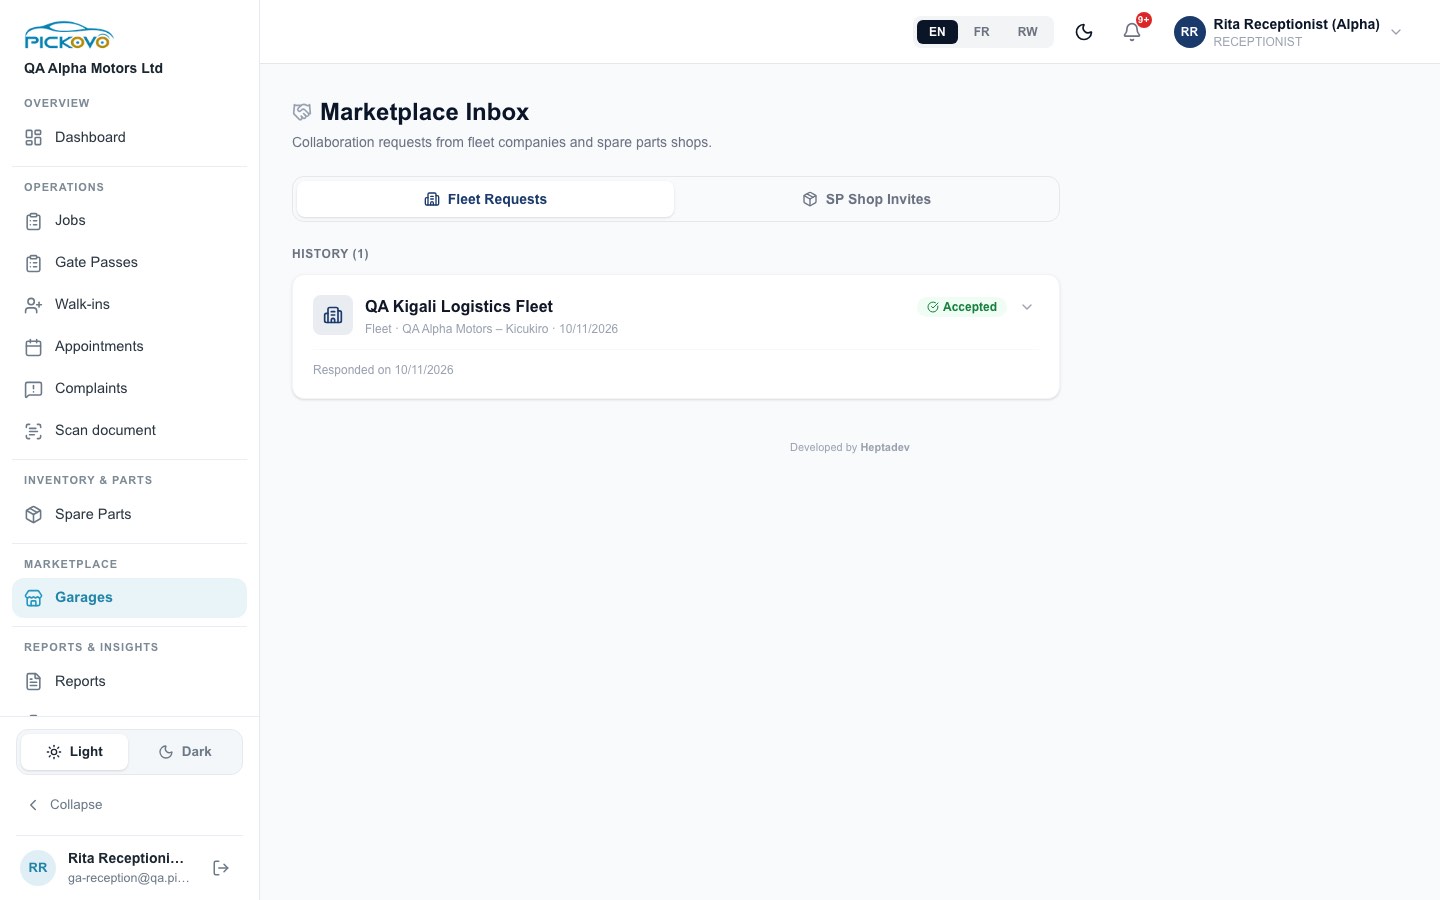
The Fleet Requests and SP Shop Invites tabs list requests and their status. Click the arrow to expand one. Accepting or declining requests is for the garage admin. You can view them only.
C.13 Car-owner app pages (enabled per garage)
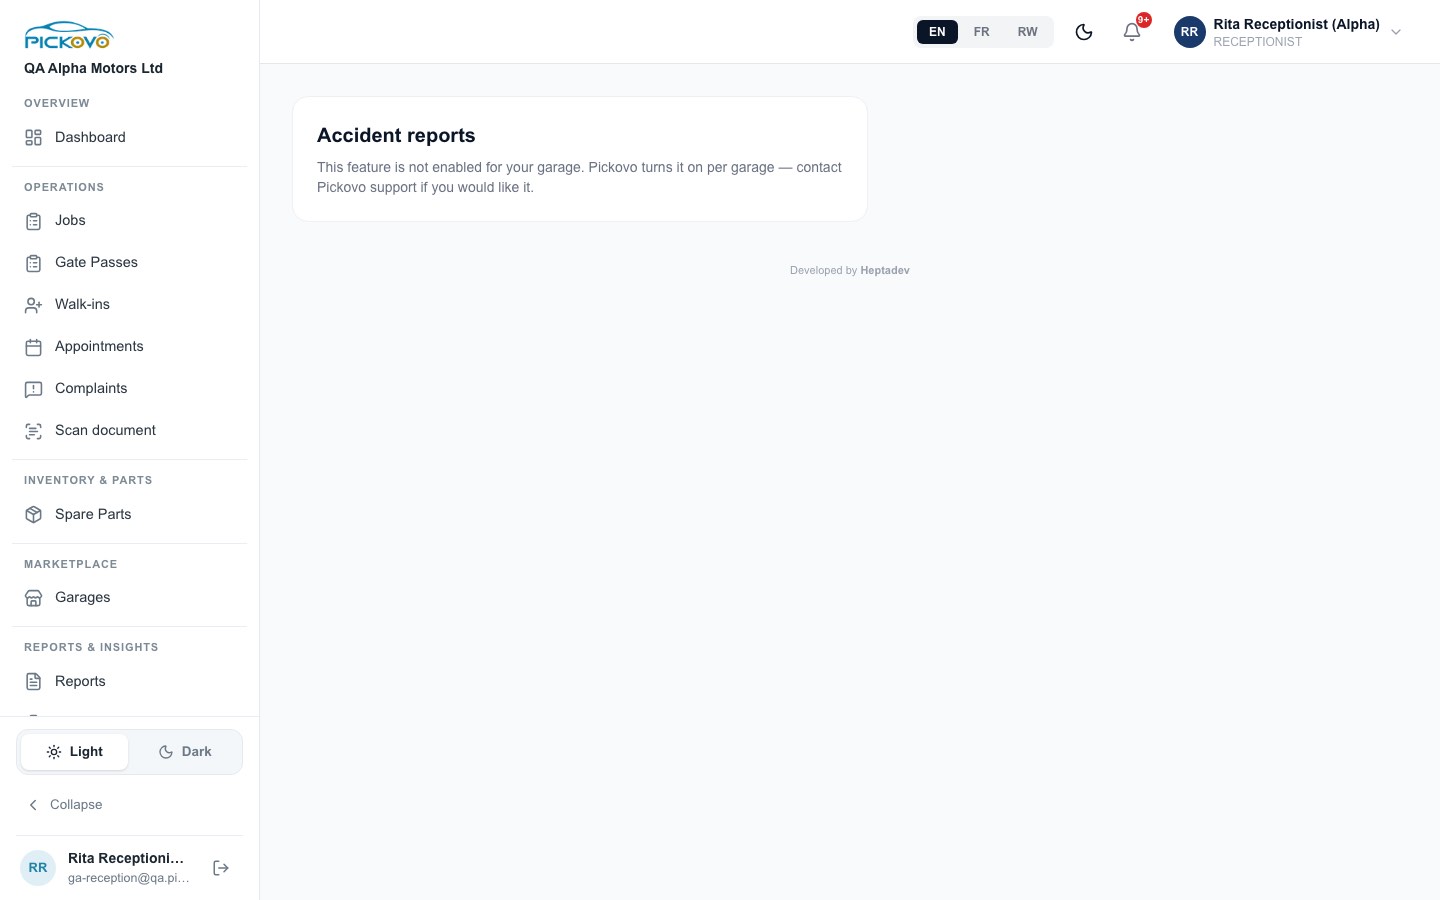
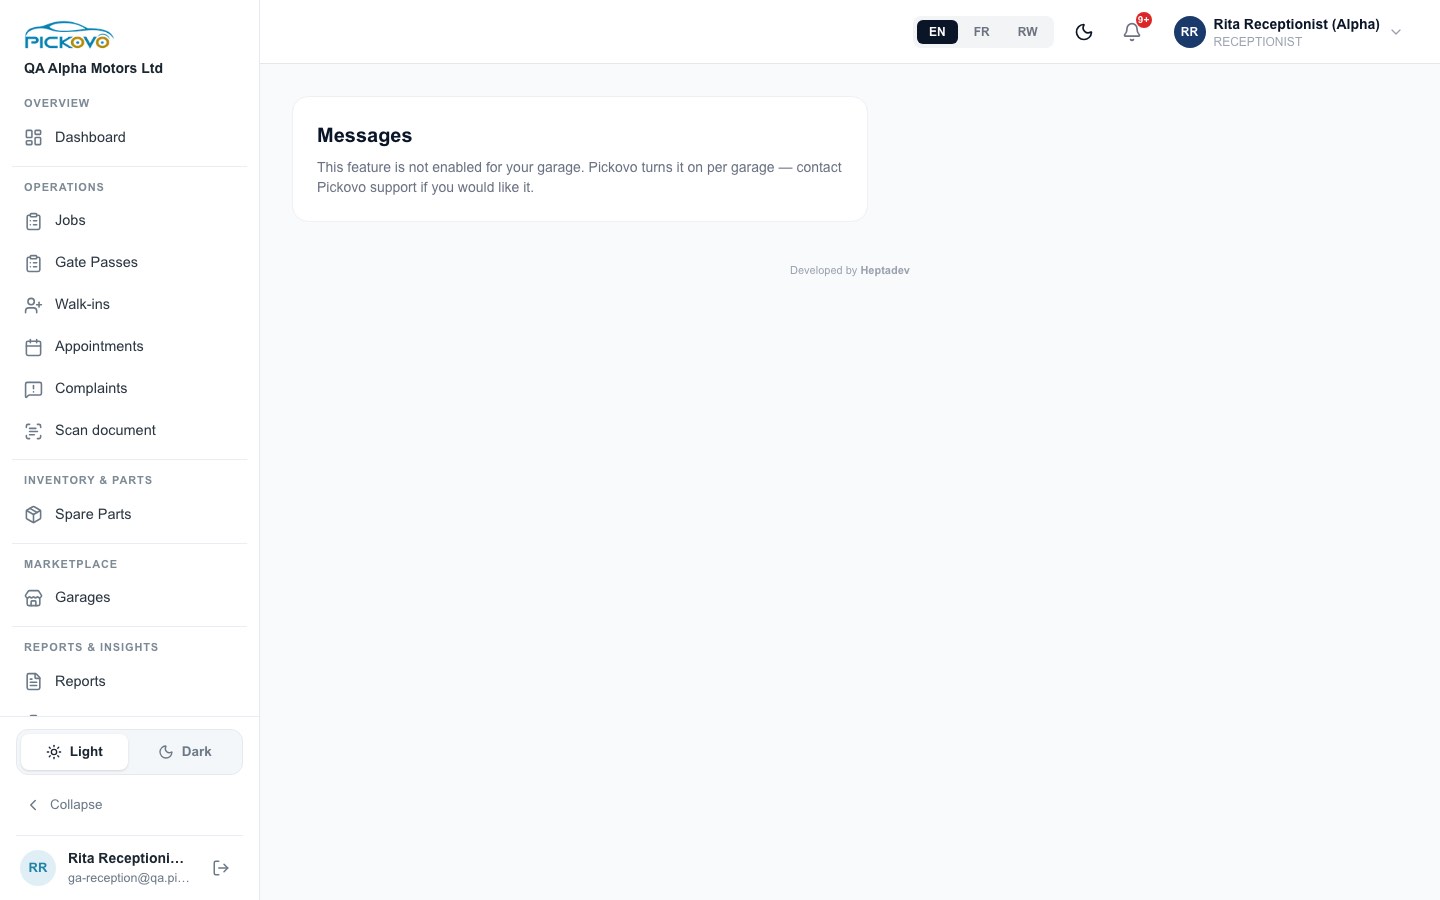
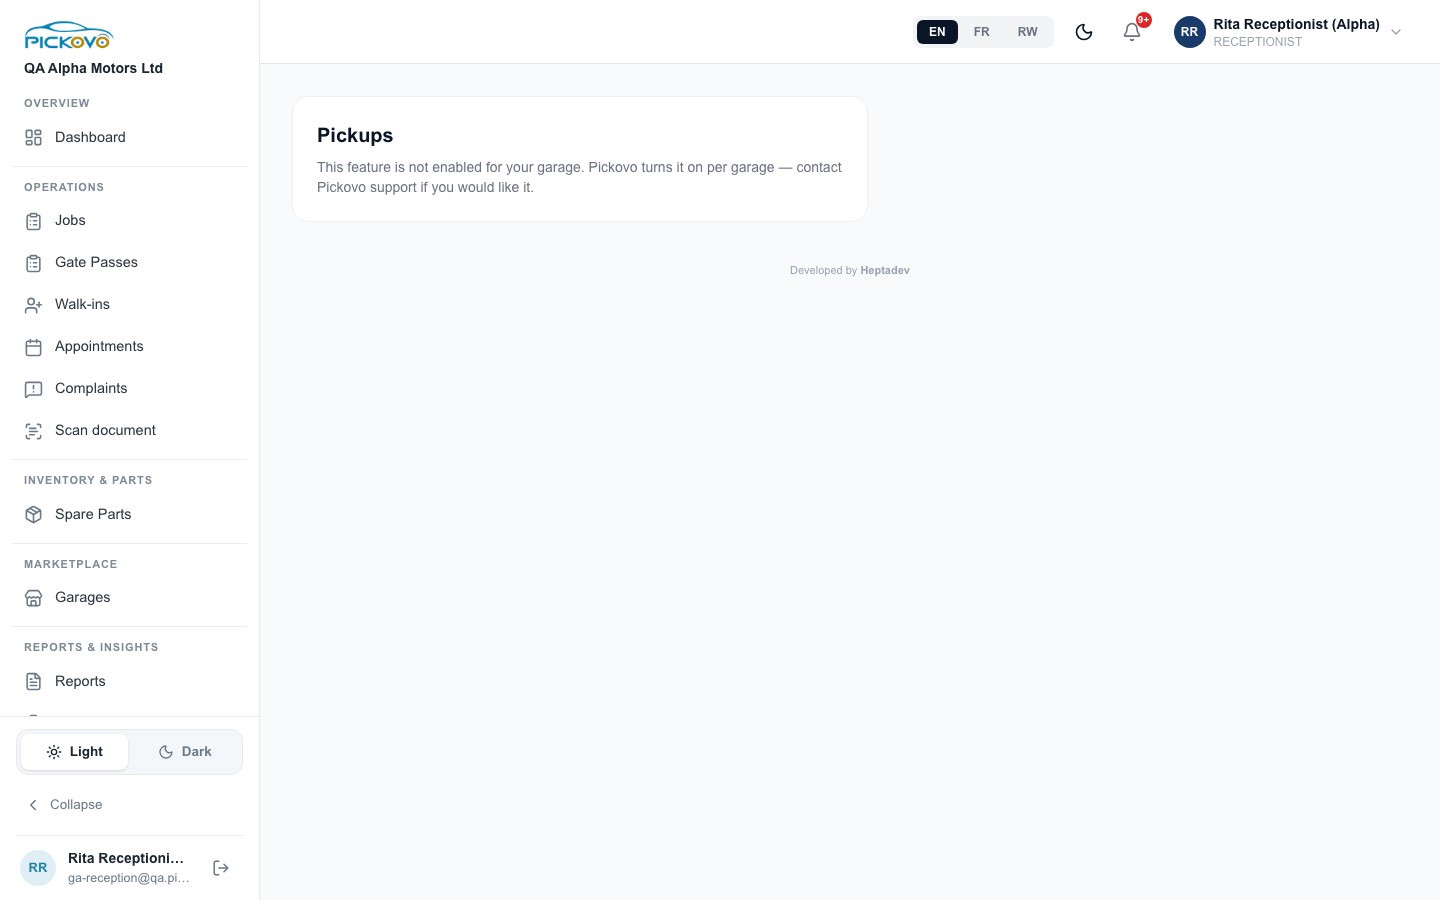
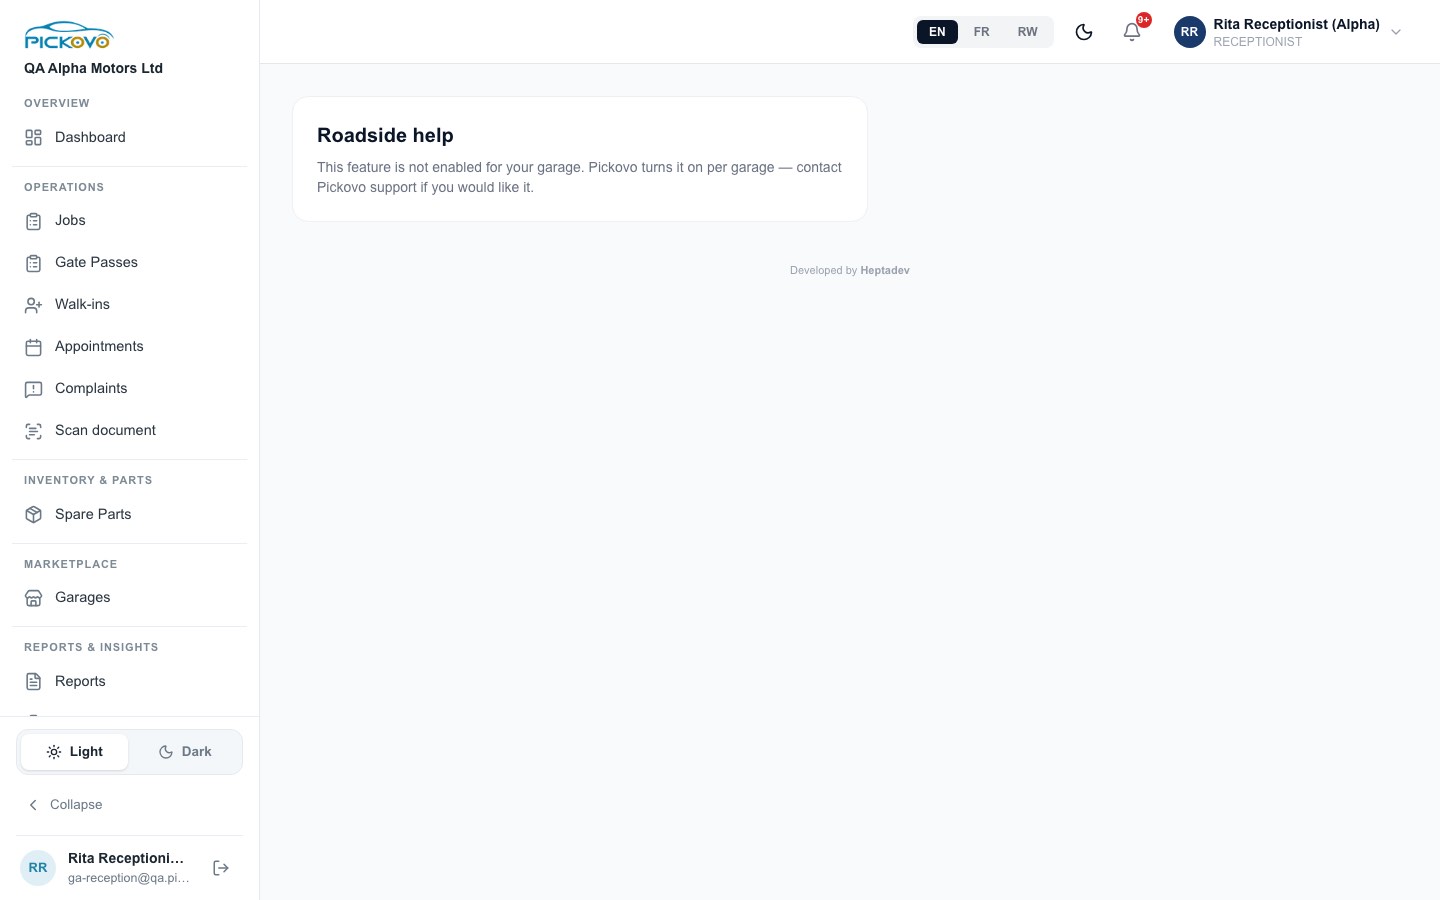
Pickovo turns some car-owner features on per garage. When a feature is off you see a notice: "This feature is not enabled for your garage. Pickovo turns it on per garage, contact Pickovo support if you would like it." These pages have no sidebar link. A booking may link to them ("Message owner", "Accident report shared") when the feature is on.
C.14 Scan document
Scan document in the sidebar opens the AI Document Scanner:
- Take a photo of a paper document, or upload an image.
- Pickovo reads it into editable text.
- Review and correct the text.
- Optionally save it, or download it as a PDF.
Pictures are read by Pickovo's AI service and are not stored. Only text you choose to save is kept.
C.15 Your settings
Settings in the sidebar holds your profile: name, email, phone number, and a password change (current password, new password, confirm). You also have notification preferences and the referral page. Garage-wide settings, staff and roles are for the garage admin only.
D. What you can and cannot do
Defaults from the permission catalogue and the measured page matrix. Your garage admin may change them.
| Area | View | Create | Edit | Delete / Cancel | Approve | Notes |
|---|---|---|---|---|---|---|
| Dashboard, notifications | Yes | - | - | - | - | |
| Walk-in customers | Yes | Yes | Yes (and merge) | - | - | No delete; merge duplicates instead |
| Jobs board and job cards | Yes | Yes | Yes details while open | Yes decline while Pending | Yes accept/check in (Pending only) | No later stage moves |
| Mechanic on a job | Yes | Yes at creation | Yes while Pending | - | - | No assignment after acceptance |
| Appointments | Yes | Yes | Yes change time | Yes cancel | Yes confirm owner bookings | |
| Gate passes | Yes | Yes | - | - | - | Approve and close: garage admin |
| Workshop Reports, Daily Report | Yes | Yes downloads | Yes KPI targets | - | - | No money columns by default |
| Garage Reports | Yes | Yes exports | - | - | - | Revenue hidden |
| Complaints | Yes | Yes | Yes notes, assign, due date | - | Yes resolve / reopen | |
| Reviews | Yes | Yes reply | Yes edit reply | Yes remove reply | - | Only if Reviews is enabled |
| Spare Parts marketplace | Yes | Yes part requests | - | - | - | Needs an accepted collaboration |
| Marketplace inbox | Yes | - | - | - | - | Responding: garage admin |
| Scan document | Yes | Yes | Yes | - | - |
Cannot access (redirected to your dashboard): Invoices, Expenses, Incentives, Inventory (stock, movements, change requests, part requests, purchase orders, new item), Dead stock, Suppliers, Supplier report, Mechanics, Compliance, Certification, Garage Family, Garage Settings and Settings → Roles, Settings → Activity, Billing.
E. Common workflows
E.1 A walk-in customer at the counter
- You: in Walk-ins, search the customer's phone or plate. If they are new, click Add Customer and save their details and vehicle.
- You: click + New Job on their row, enter the title and description, and optionally a mechanic. Click Create Job.
- You: open the job and click Accept Job. Record the odometer, fuel and damage, then click Check In.
- Workshop (head mechanic or admin, then the mechanic): assigns the work, diagnoses, quotes, repairs and passes quality check.
- Cashier: invoices and takes payment.
- You: at handover, open the job from Ask for Feedback on your dashboard and record the customer's feedback. If the car leaves the premises, issue a Gate Pass with purpose "After Service".
E.2 A car owner's booking from the Pickovo app (workflow W3)
- Car owner: books a service slot in the Pickovo app. It arrives as Requested in your Appointments.
- You: click Confirm. A Pending job card is opened for the booked time and the owner is told it is confirmed.
- You (when the car arrives): click Open job card, then Accept Job, record the check-in details (in the test: odometer 64,850 km, fuel half, "small scratch on rear bumper") and click Check In. The owner's app shows the car as received.
- Mechanic, then garage admin: repair, quality check, complete. The owner sees each stage.
- Garage admin / cashier: issue the invoice and record payment. The owner may also pay in the app by mobile money, which only works when the garage's payment provider is configured.
- Garage admin: closes the job. The booking moves to your closed appointments.
- Car owner: leaves a review. You: reply under Reviews.
E.3 A fleet company's repair job (workflow W1)
- Driver reports a problem. The fleet manager approves it and sends the job to your garage.
- You: the job appears in the New column of the Jobs board and in notifications. Open it and click Accept Job, recording check-in details when the vehicle arrives. The fleet manager is notified that the job was accepted.
- Head mechanic: assigns a mechanic. Mechanic: diagnoses. The garage sends a quotation and the fleet company approves it.
- Workshop: repairs and passes quality check. Cashier / admin: invoices and records payment. Admin: closes the job.
- You: follow progress from the board and notifications, and answer the fleet's calls using the job card.
E.4 End of day
- You: open Workshop Reports and check that the vehicle-movement row for today reconciles (green tick).
- In the Daily Report bar, keep today's date and click Excel or PDF.
- Hand the file to your garage admin as your garage requires.
F. Troubleshooting
| Problem | Likely cause | What to do |
|---|---|---|
| You click a page and land back on your dashboard | Your role does not have that page's permission. | Ask your garage admin to grant it under Settings → Roles, if appropriate. |
| "Invalid email or password" although the password is right | Too many failed attempts (10 in 15 minutes) paused sign-in, or your account was deactivated. | Wait 15 minutes, or use Forgot password?. If it continues, ask your garage admin. |
| You were signed out in the middle of work | Your account was deactivated or your role changed. This takes effect within seconds. | Contact your garage admin. |
| No Accept Job button on a job | The job is no longer Pending. Receptionists can only accept or decline Pending jobs. | Ask the head mechanic or garage admin to move it. |
| "This job has already been checked in." | Check-in can be recorded only once. | Add any later observations in the job's Notes. |
| "This job is closed. Ask a garage admin to correct it." | Closed and declined jobs are a permanent record. | Ask the garage admin. |
| "The details saved, but the mechanic could not be reassigned." | You can change the mechanic only while the job is Pending. | Ask the head mechanic. |
| Booking time refused (slot taken) | That time is full, or the mechanic is busy. | Pick another time or mechanic. |
| "Choose a time in the future" when moving a booking | The new time is in the past. | Pick a later time. |
| "This booking has a job card: move it on the job card." | Once confirmed, a booking follows its job card. | Use Open job card. |
| "Customer name or vehicle plate is required" (gate pass) | Both fields were empty. | Fill in at least one. |
| No Approve / Close on a gate pass | Only the garage admin can approve or close. | Ask the garage admin. |
| "This feature is not enabled for your garage" | Pickovo has not turned that car-owner feature on for your garage. | Your garage admin can contact Pickovo support. |
| No Daily Report bar on Workshop Reports | Your garage removed reports.daily from the Receptionist role. |
Ask your garage admin. |
G. Security and best practices
- Keep your login to yourself. Never share your password or let a colleague work under your name. Check-ins, edits, merges and gate passes are recorded against your account.
- Sign out with Logout when you leave the counter, especially on a shared computer.
- Use a strong, unique password and change it under Settings if you think someone has seen it. If two-factor authentication is set up for your account, keep the authenticator app on a phone only you use.
- Customer data is personal data. Names, phone numbers and plates are for running the job only. Do not copy them into personal phones or chat groups.
- Downloaded reports are confidential. The Daily Report contains client payment details. Store it only where your garage requires and delete stray copies from shared computers.
- Customer progress links are private. Give them only to the vehicle's owner or driver.
- Record check-in honestly and completely. Odometer, fuel and existing damage protect both the customer and the garage in a dispute.
- Merge with care. Check phone and plate before merging two customers. A merge cannot be undone.
- Review replies are public. Stay polite and factual, and never include another customer's details or prices.
- If you notice something wrong, such as a job or customer from another garage, or a page you should not be able to see, tell your garage admin straight away.