
Spare-parts supplier · SPARE_PARTS_ADMIN
Spare Parts Shop Admin
For the owner or manager of a spare-parts shop that sells parts to garages and fleet companies on Pickovo.
All names, shops, garages, plates, references and amounts in the screenshots (for example "Paul Parts-Admin", "QA Nyabugogo Spares", "QA Alpha Motors Ltd", "RAD 102 Q") are fictional test data.
A. Introduction
Pickovo connects your spare-parts shop with the garages and fleet companies that buy from you. As the shop admin you run the shop's whole Pickovo workspace:
- Inventory, keep your catalogue of parts, prices, stock levels and storage locations up to date, and record stock coming in, going out and coming back.
- Requests, receive parts requests from garages and answer them with a quotation.
- Quotations and invoices, send priced quotations, turn accepted ones into invoices, and record the payments you receive. Only your shop sets an invoice's status; the buyer cannot mark your invoice paid.
- Marketplace, accept or reject collaboration requests from garages and fleet companies, and invite garages to work with you.
- Money, track your shop's operating expenses and manage your Pickovo subscription.
- Team and shop profile, create accounts for your stock keepers and keep your shop's public details current.
Your shop may also have stock keepers (role SPARE_PARTS_STOCK_KEEPER). They can look at stock, requests and deadstock but cannot price, quote, invoice or change the shop's settings. You create and manage their accounts (see C.12).
B. Getting started
Signing in
- Open https://fleet.heptadev.com/en/login in your browser. Use
/fr/loginfor French or/rw/loginfor Kinyarwanda, or tap EN / FR / RW at the top of the page. - In Email or Phone, enter your email address or your phone number.
- Enter your Password. The eye icon shows or hides what you typed.
- Select Log in.
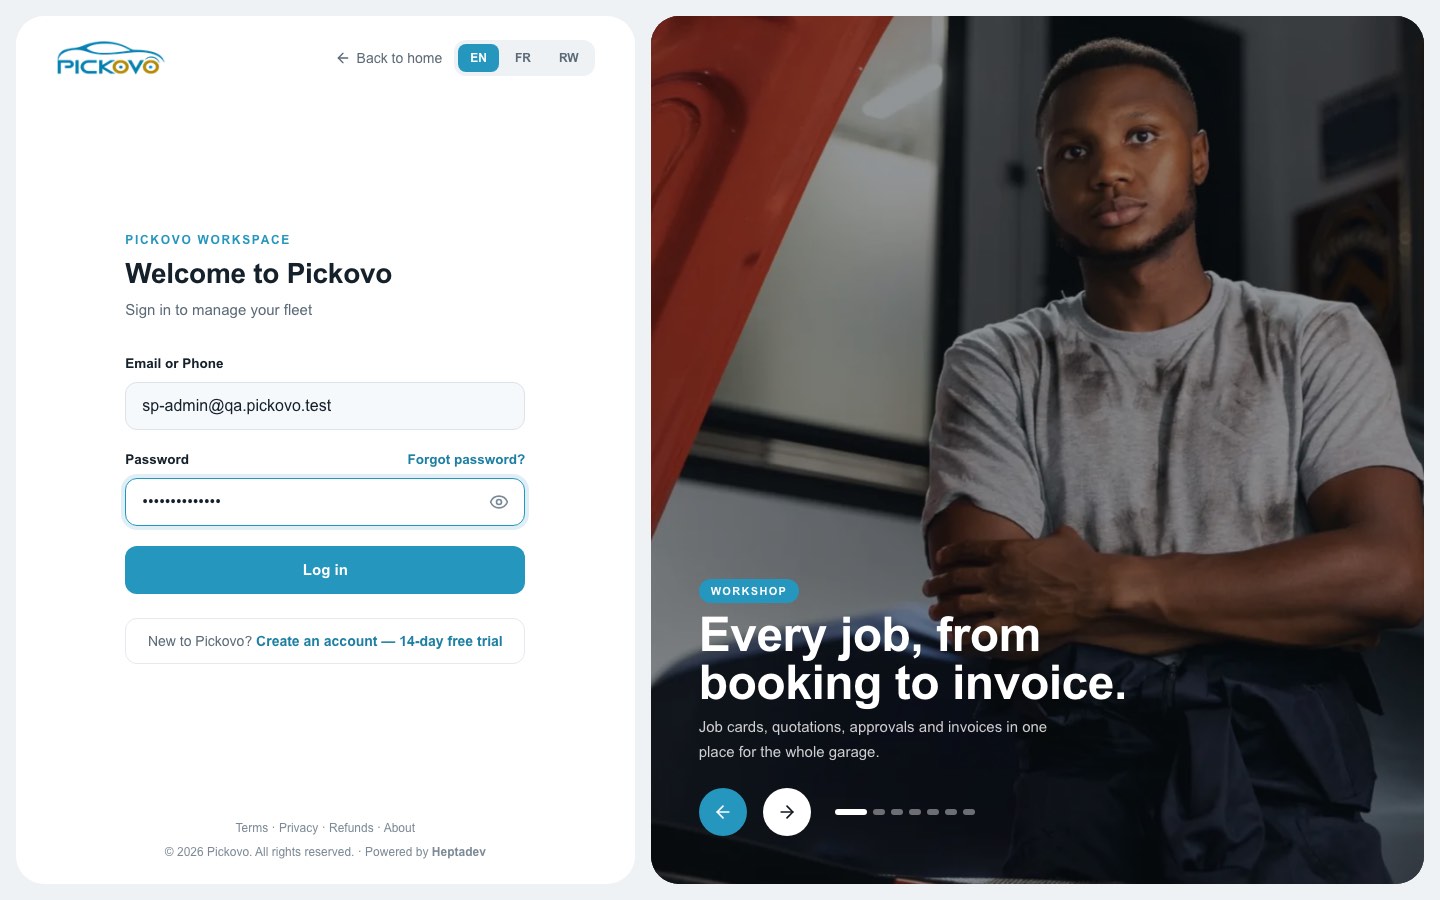
Figure 1: The sign-in page, with the shop admin's email entered.
- Forgot password? sends you a link to set a new password.
- If two-factor authentication is already switched on for your account, you are asked for the 6-digit code from your authenticator app after your password. (The screen to switch it on is not yet available in the spare-parts workspace; see section G.)
- After 10 wrong passwords within 15 minutes, sign-in is paused for that account. Wait 15 minutes, or use Forgot password?.
- Create an account, 14-day free trial is for new organisations, not for adding staff. Add your staff from Shop Settings (C.12).
Your dashboard
After signing in you land on the Spare Parts Dashboard.
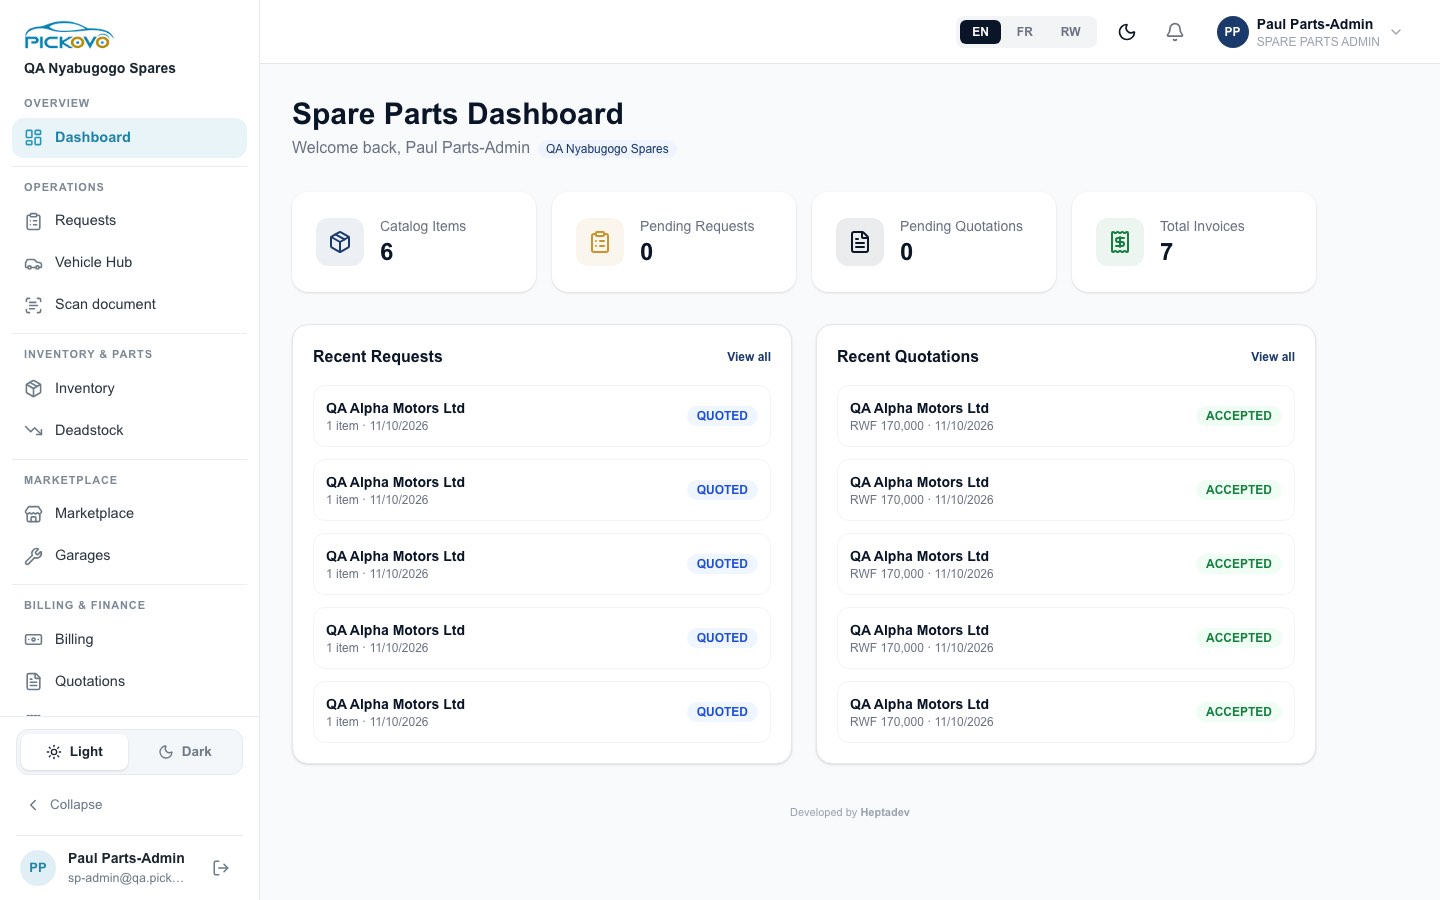
Figure 2: The Spare Parts Dashboard: four counters, the five most recent requests and the five most recent quotations.
| Card | What it counts |
|---|---|
| Catalog Items | Active items in your inventory |
| Pending Requests | Requests from buyers that you have not yet quoted (status PENDING) |
| Pending Quotations | Quotations still in DRAFT or SENT, not yet accepted or rejected |
| Total Invoices | Every invoice your shop has issued |
Recent Requests and Recent Quotations list the latest five of each with their status. Click a row to open it, or View all to open the full list.
The top bar and sidebar
The top bar has the language switch (EN / FR / RW), a moon icon for dark mode, the bell for your notifications, and your name and role. Clicking your name opens a menu with Log out.
The sidebar groups your pages:
| Section | Items |
|---|---|
| Overview | Dashboard |
| Operations | Requests, Vehicle Hub, Scan document |
| Inventory & Parts | Inventory, Deadstock |
| Marketplace | Marketplace (your collaboration inbox), Garages |
| Billing & Finance | Billing, Quotations, Invoices, Expenses |
| Lower down (scroll the sidebar) | Activity Log, Settings (Shop Settings), Refer & Earn |
At the bottom are the Light / Dark switch, Collapse (shrinks the sidebar to icons; point at an icon to see its name), and your name and email with the log-out button.
- Vehicle Hub shows vehicles listed for sale on Pickovo. It is not part of running your shop and is not covered further here.
- Scan document opens the AI document scanner for photographing paper documents. It works only if your subscription plan includes AI features.
- The sidebar Settings item opens Shop Settings (your shop's profile and team). Your personal profile and password page is at
https://fleet.heptadev.com/en/settings(C.15). There is no sidebar link to it yet, so bookmark it.
C. Features
C.1 Inventory
Purpose: keep the list of parts you sell, with price, stock level and location.
Open Inventory in the sidebar.
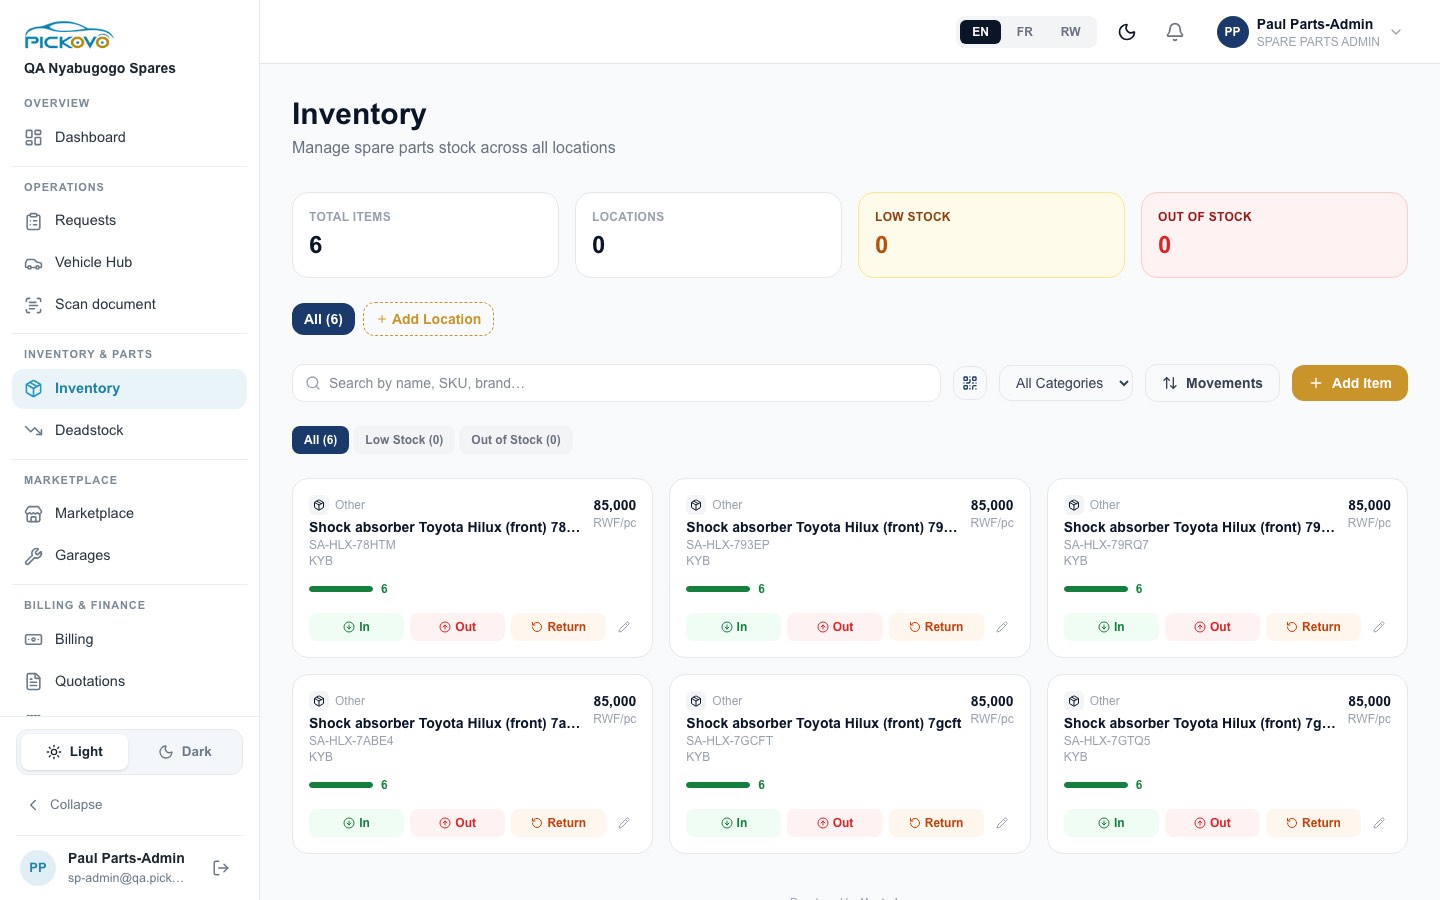
Figure 3: Inventory: summary counters, location tabs, search and filters, and one card per item with In / Out / Return buttons.
What you see
- Counters: Total Items, Locations, Low Stock and Out of Stock.
- Location tabs: All plus one tab per location (warehouse or branch). + Add Location creates a new one (name, plus an optional address). When a location tab is selected, a pencil next to it lets you rename it.
- Search by name, SKU or brand. The QR icon opens the camera so you can scan a barcode or QR code; the scanned code is put into the search box.
- All Categories filters by category (Oil, Tyres, Brakes, Filters, Electrical, Body, Other).
- All / Low Stock / Out of Stock quick filters.
- Movements opens the stock-movement history (C.2). + Add Item adds a new part.
- Each item card shows category, name, SKU, brand, price per unit and a stock bar with the quantity. Click the name to open the item's page.
Add an item
- Select + Add Item.
- Choose a Location (or "No specific location"). You can create a new location from this form too.
- Fill in Name * (or scan the barcode to fill it), Brand, Category *, Unit * (Piece, Litre, Kilogram, Set), Unit Price (RWF) *, Supplier, Initial Quantity, Low Stock Threshold and Description.
- Save. The SKU is generated automatically.
If an item with the same name (or SKU) already exists at the same location, Pickovo does not create a duplicate: it adds the initial quantity to the existing item and records it as a "Stock In".
Record stock in, out or returned
- On the item card, select In (goods received), Out (goods leaving the shelf) or Return (goods coming back).
- Enter the Quantity. For Stock In you can also correct the Unit Cost (RWF). Add notes such as a delivery reference or reason if you like.
- Confirm. The stock bar updates straight away.
- Out is refused with "Insufficient stock. Available: …" if you try to take out more than you hold.
- When an Out brings an item down to its low-stock threshold, every shop admin gets a Low stock alert notification.
- These buttons are hidden while you are offline. A banner says stock operations need a connection.
Item page and editing: the item page shows its details, the same item at your other locations, and its full movement history. Edit lets you change the name, SKU, brand, category, unit, unit price, low-stock threshold, supplier, description and location. The pencil icon on the card also opens the edit form.
Restrictions: only shop admins see + Add Item, + Add Location, In / Out / Return and Edit. Stock keepers can view only.
C.2 Stock movements
Purpose: a 30-day log of every stock change, and a place to record a movement for any item.
Open Inventory → Movements.
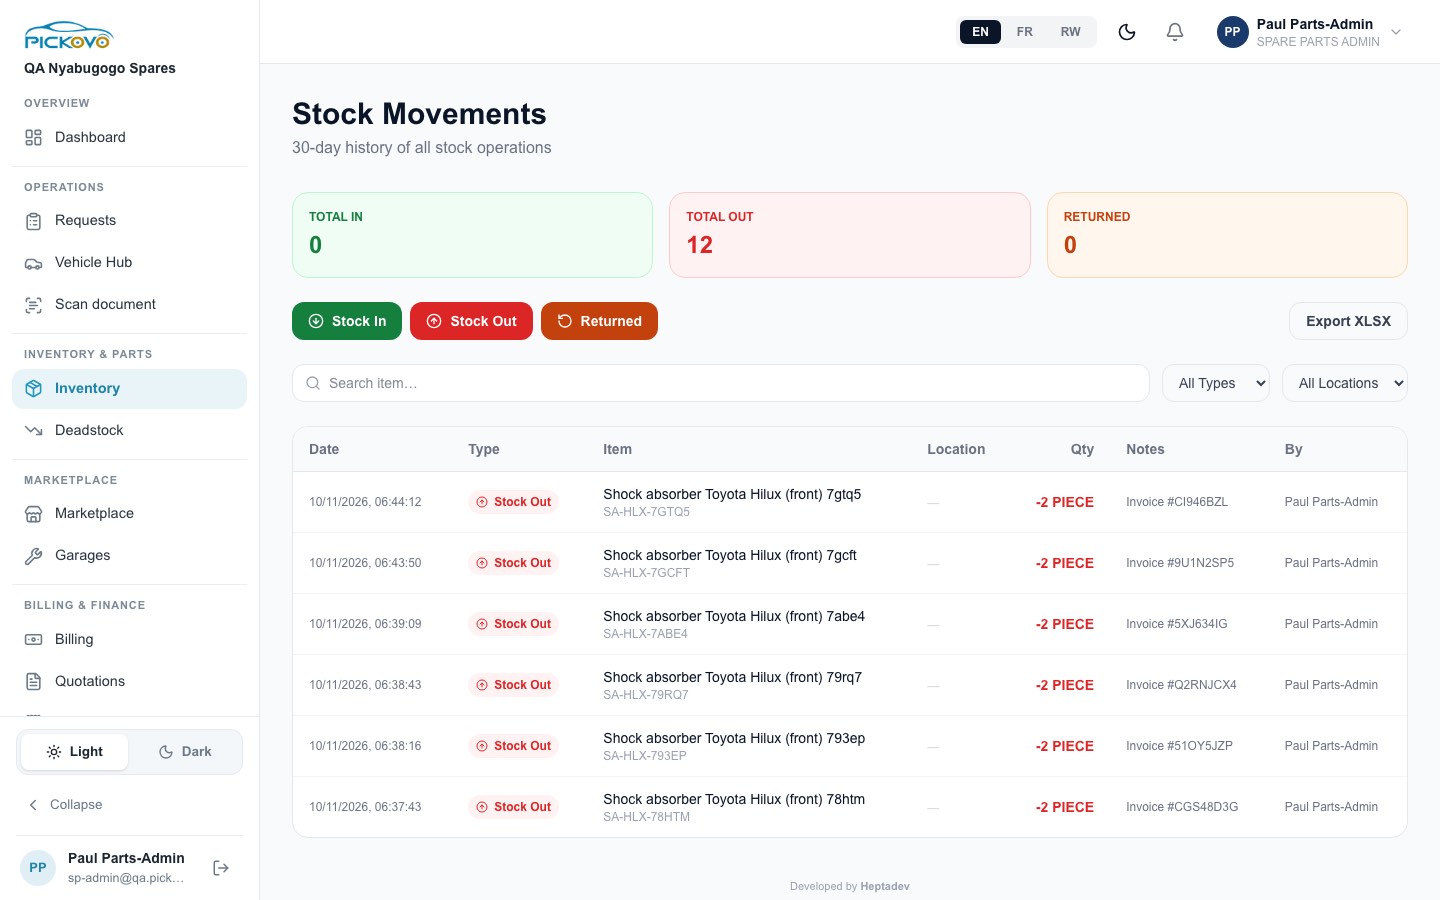
Figure 4: Stock Movements: Total In / Total Out / Returned counters, recording buttons, filters and the movement table. The Stock Out rows were created automatically by invoices.
- Total In, Total Out and Returned add up the quantities moved in the last 30 days.
- Stock In, Stock Out and Returned open a form: choose the location, pick the item, then enter the quantity, the unit cost (Stock In only) and optional notes.
- Export XLSX downloads the list as an Excel file.
- Filter by Search item…, All Types and All Locations.
- The table shows the date, type, item, location, quantity, notes and the person who recorded it. Stock taken off by an invoice shows "Invoice #…" in Notes.
C.3 Deadstock analysis
Purpose: find stock that is not selling, so your money is not tied up on the shelf.
Open Deadstock.
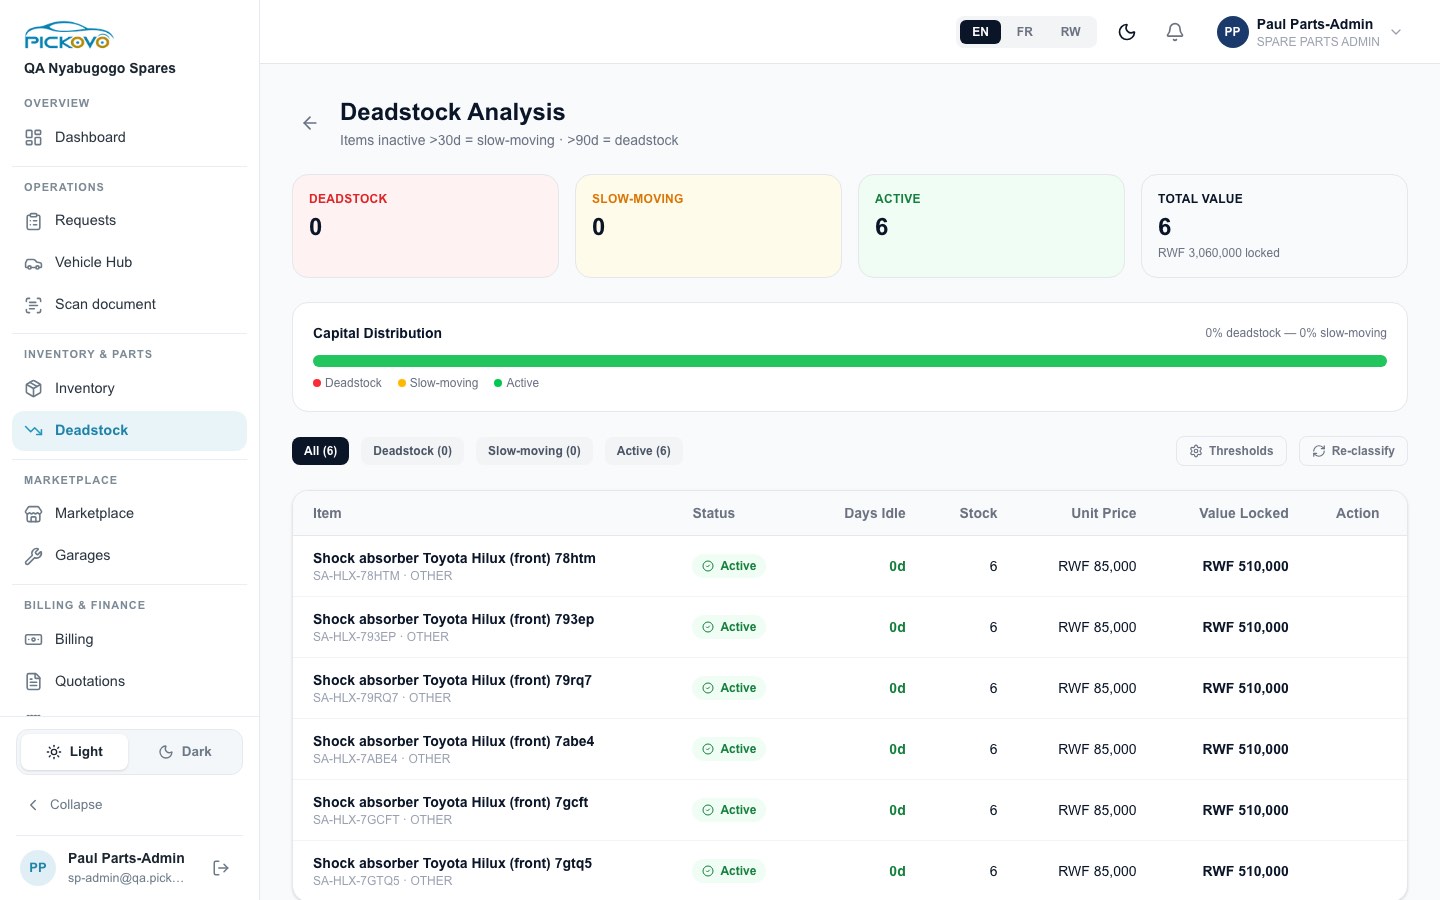
Figure 5: Deadstock Analysis: counters, the capital-distribution bar and each item's status, idle days and locked value.
- Each item is classed Active, Slow-moving (no movement for more than 30 days by default) or Deadstock (more than 90 days).
- Total Value shows how much money is tied up in stock ("RWF … locked"). The Capital Distribution bar splits it into deadstock, slow-moving and active.
- Filter with All, Deadstock, Slow-moving and Active.
- Thresholds opens Classification Thresholds. Set Slow-moving after (days) and Deadstock after (days), tick or untick Enable automatic daily classification, then select Save.
- Clearance appears in the Action column for slow-moving and deadstock items. It suggests a price 30% lower. Adjust it and select Apply to change the item's unit price.
- Re-classify is meant to recalculate the classes straight away. On the current build it may do nothing. If so, wait for the automatic daily classification.
The thresholds depend on your subscription plan including the deadstock feature.
C.4 Requests from garages
Purpose: see what garages want to buy from you and answer them.
Open Requests.
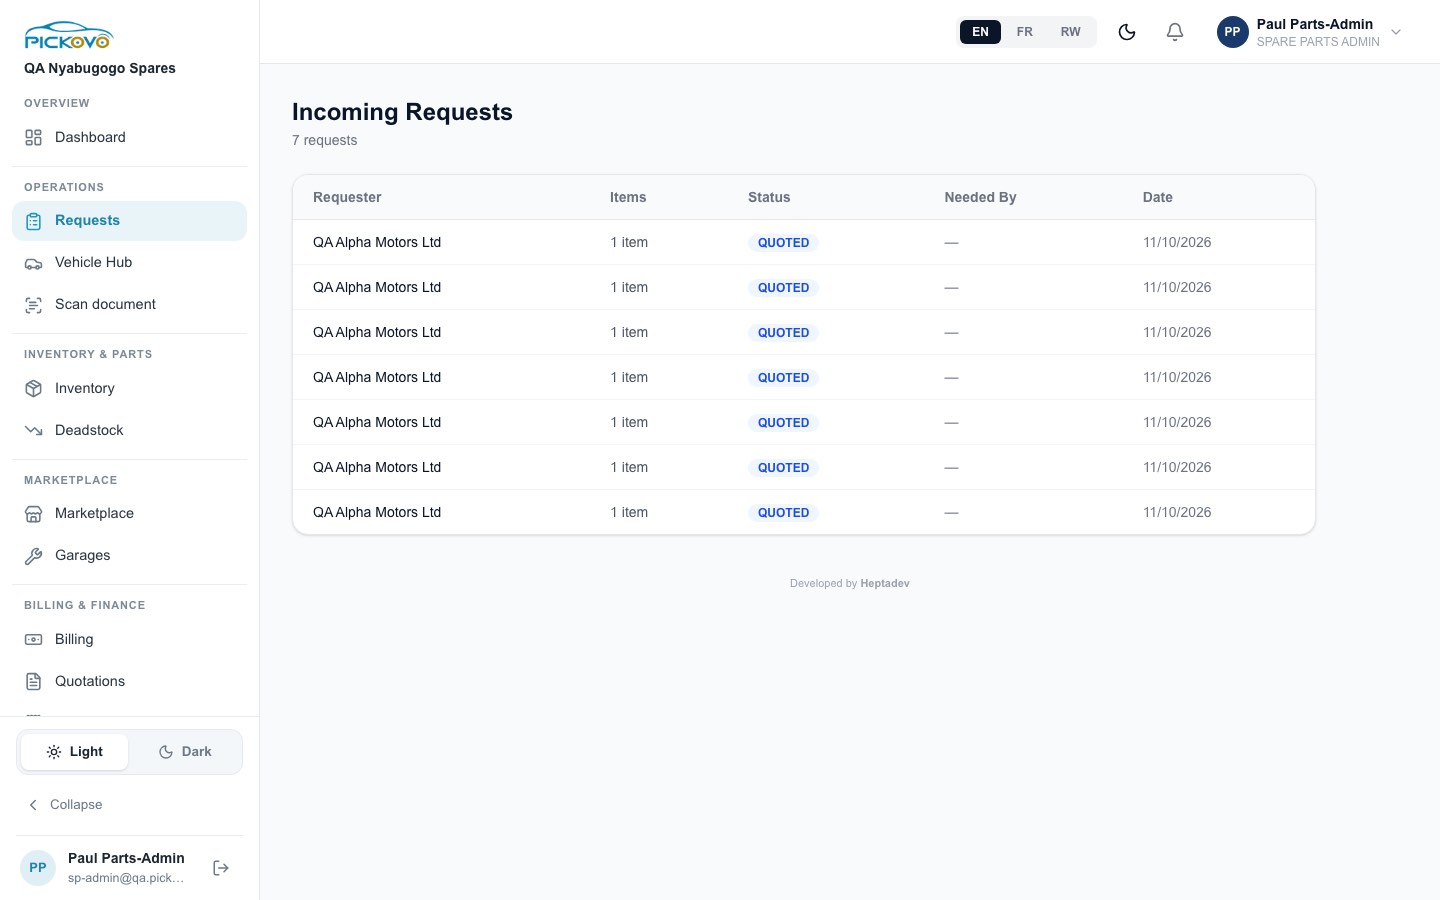
Figure 6: Incoming Requests: who asked, how many items, status, needed-by date and request date.
A request is created by the buyer (a garage, for example) from its own Spare Parts marketplace page. Each row shows the Requester, number of Items, Status (PENDING until you quote, then QUOTED), Needed By and Date. Click a row to open it.
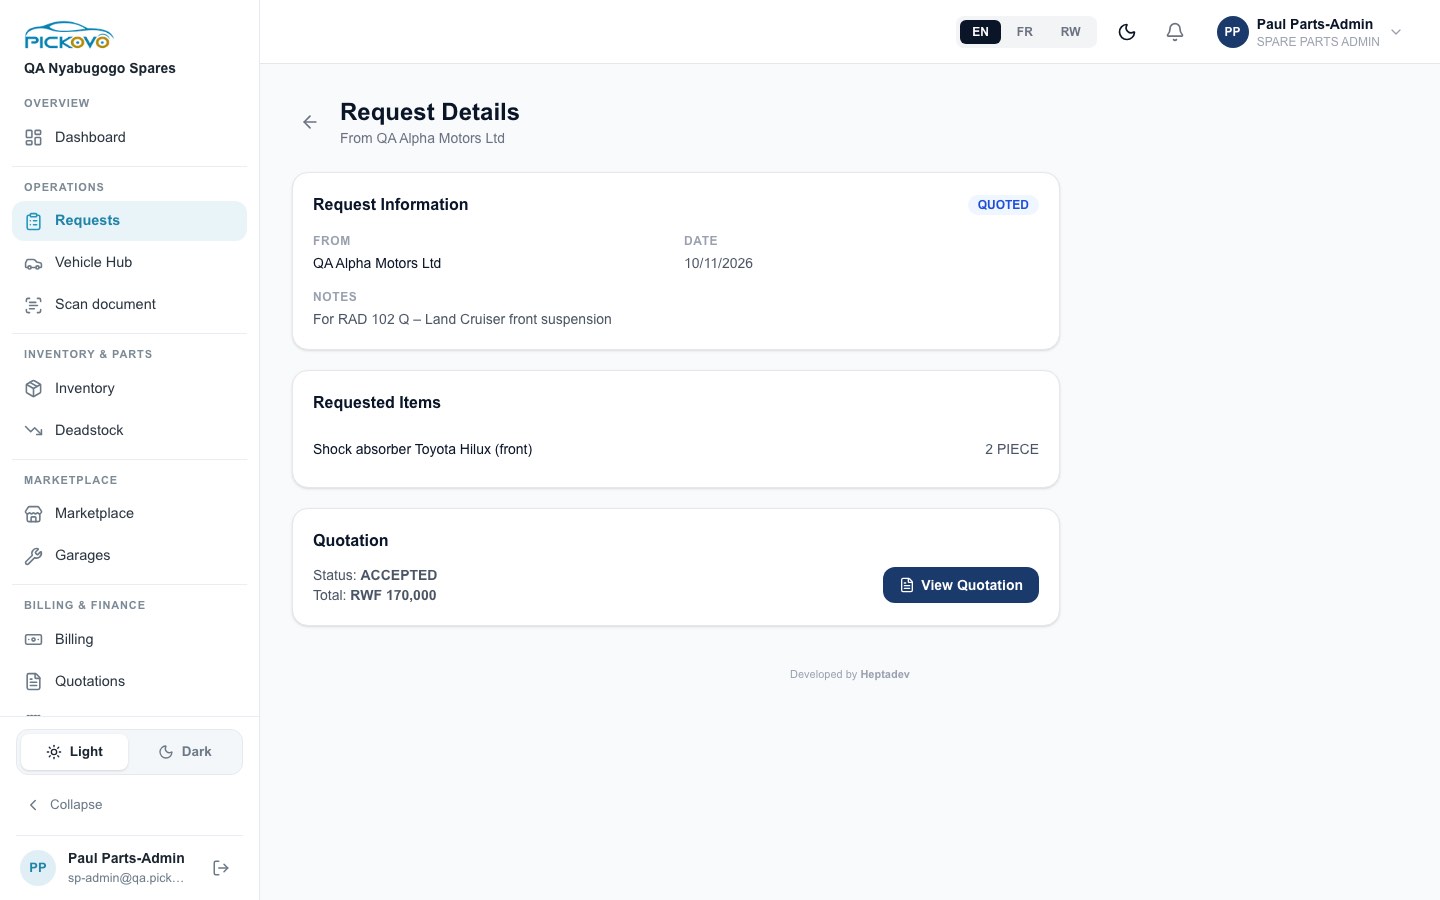
Figure 7: Request Details from QA Alpha Motors Ltd: the buyer's notes, the requested items and the quotation already sent for it.
Answer a request with a quotation
- Open a request with status PENDING.
- Under Create Quotation, select Create Quotation. The form is pre-filled with the requested items. Where the buyer chose an item from your catalogue, its catalogue price is filled in.
- For each line, pick a catalogue item or leave it as Free text, then check the name, quantity and price. Add Item adds a line; the bin icon removes one. The total updates as you type.
- Optionally set Valid Until and Notes.
- Select Create Quotation. Pickovo creates the quotation as a draft, marks the request QUOTED and opens the quotation (C.5). The buyer does not see it until you select Mark as Sent.
Once a quotation exists, the request page shows its status and total, with View Quotation. Only the shop admin can create quotations, and only while the request is PENDING.
C.5 Quotations
Purpose: price parts for a buyer and get their agreement before you invoice.
Open Quotations.
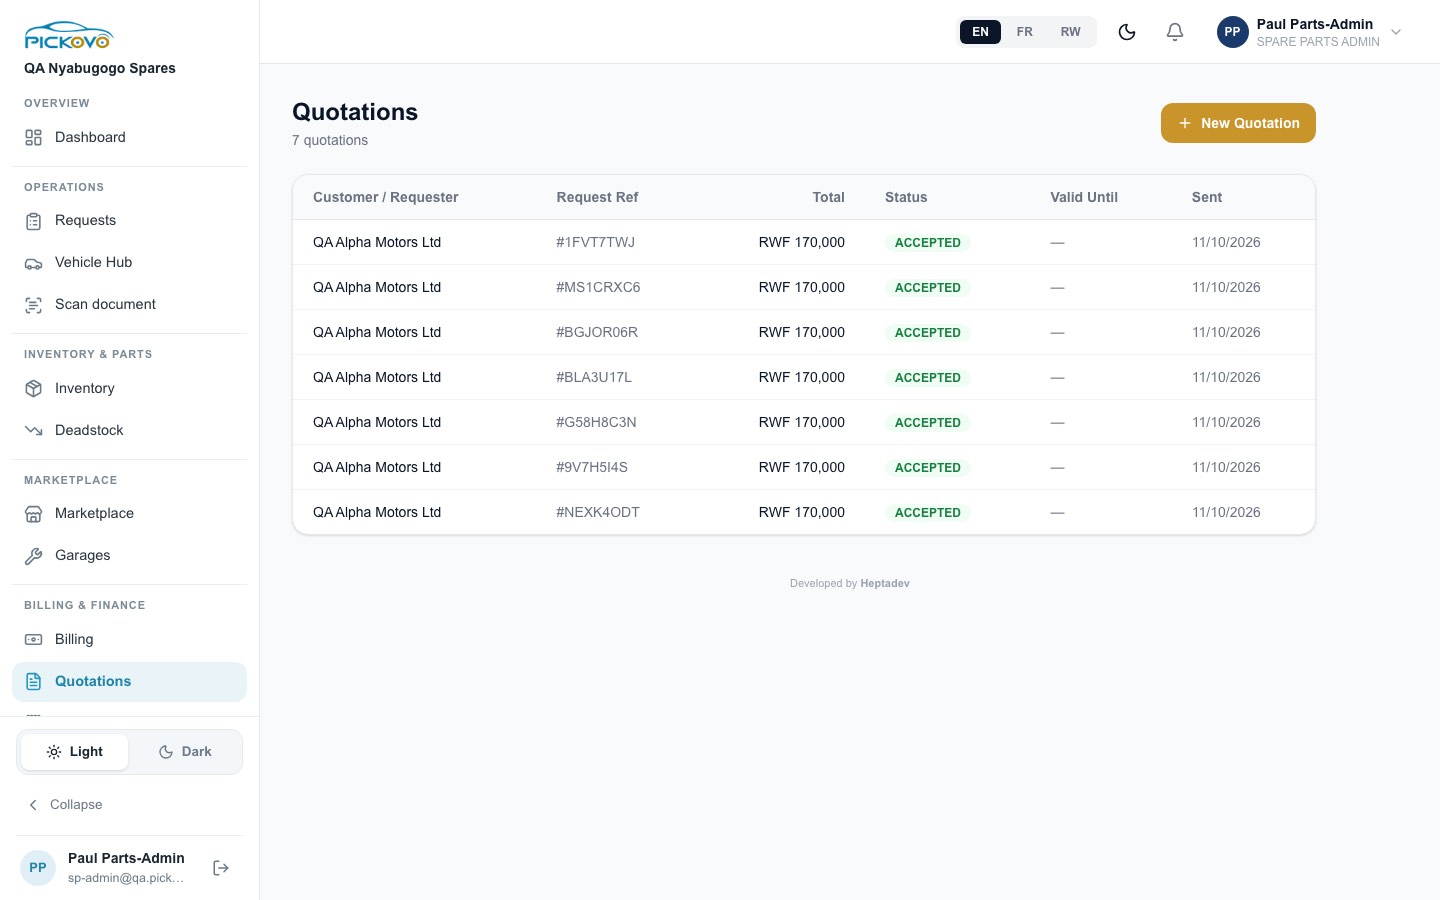
Figure 8: Quotations: customer, request reference, total, status, valid-until and sent date.
+ New Quotation creates a quotation that is not linked to a request, for a walk-in customer or a buyer who phoned. Fill in Customer Details (Customer Name, Phone, Email) and the Items. For each item, choose one from - Select from catalog - or Scan Barcode, or type it in. Set the quantity, price and an optional per-line discount. Then fill in Currency, Discount %, Tax %, Valid Until, Notes (visible to customer) and Internal Notes (staff only), and select Create Quotation.
Click a row to open the quotation.
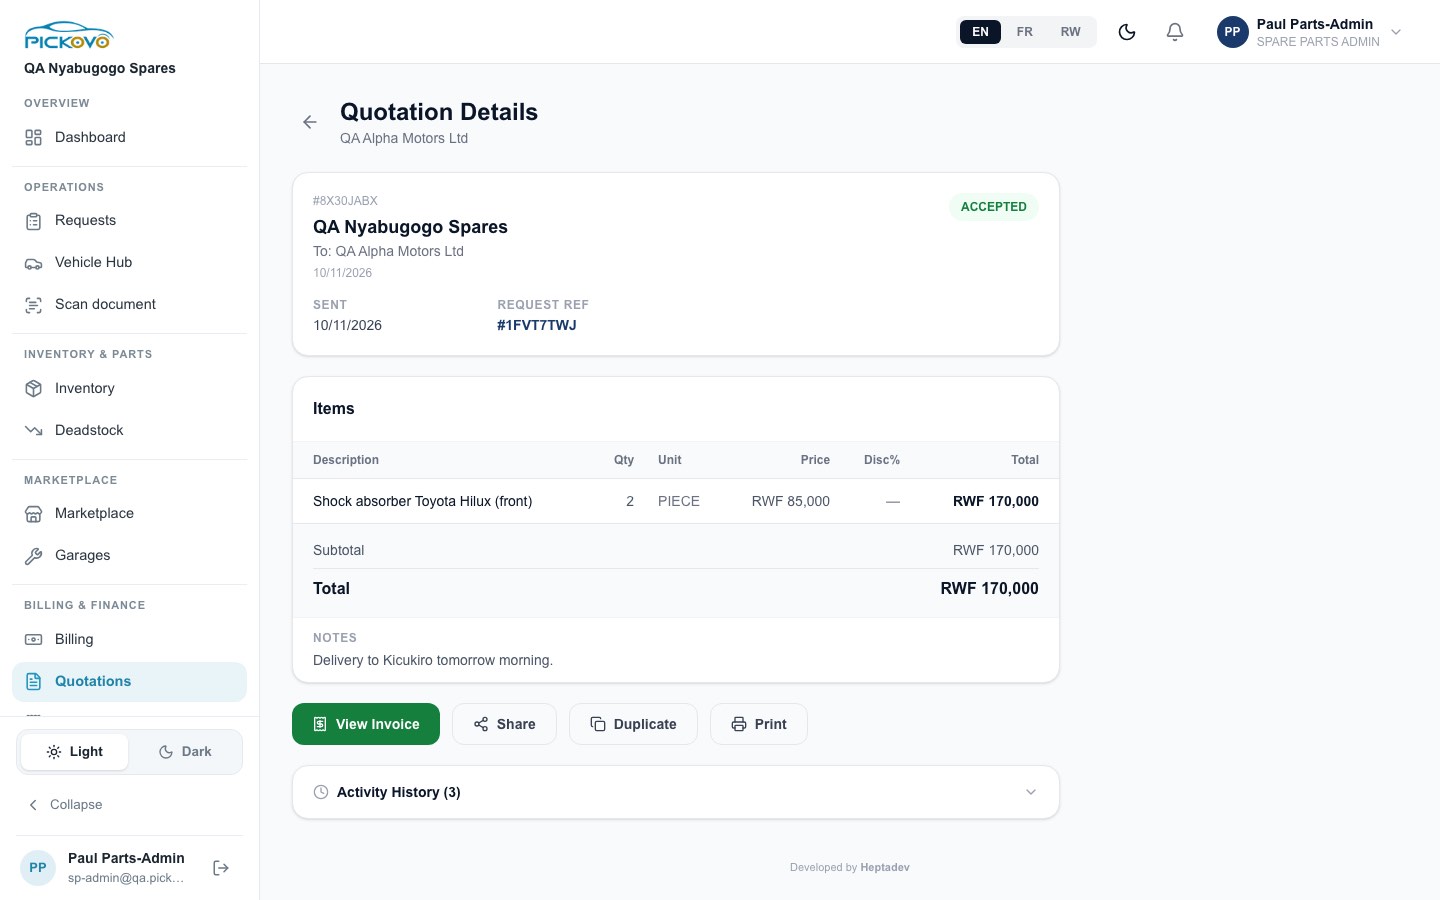
Figure 9: An accepted quotation: header with status and request reference, item lines, totals, notes and the action buttons.
Buttons on a quotation (only those that apply to its status are shown):
| Button | What it does |
|---|---|
| Mark as Sent | Sends the quotation (status SENT). The buyer can then accept it from their side. Shown until the quotation has been sent. |
| Approve | Marks the quotation ACCEPTED for the customer. Use it when the customer agrees in person or by phone. Shown for DRAFT and SENT quotations. |
| Reject | Marks it REJECTED, with an optional reason. |
| Convert to Invoice | Creates an invoice from an accepted quotation that has no invoice yet. Once one exists, View Invoice appears instead. |
| Share | WhatsApp, Email, Copy to Clipboard, or Print / Save as PDF. WhatsApp and email prepare a text summary to the customer's phone or email. |
| Duplicate | Copies the quotation into a new one that you can change. |
| Prints the quotation. | |
| Activity History | Expand it to see who created, sent, shared or converted the quotation. |
Tip, keep stock right when invoicing. To invoice an accepted quotation, use Invoices → + New Invoice → From Quotation (C.6). That route keeps the link to your catalogue items, so their stock is taken off automatically. On the current build, Convert to Invoice on the quotation page does not carry that link. If you use it, check the item's stock afterwards and record a Stock Out if needed (C.2).
C.6 Invoices and payments
Purpose: bill the buyer and record what they pay you.
Open Invoices.
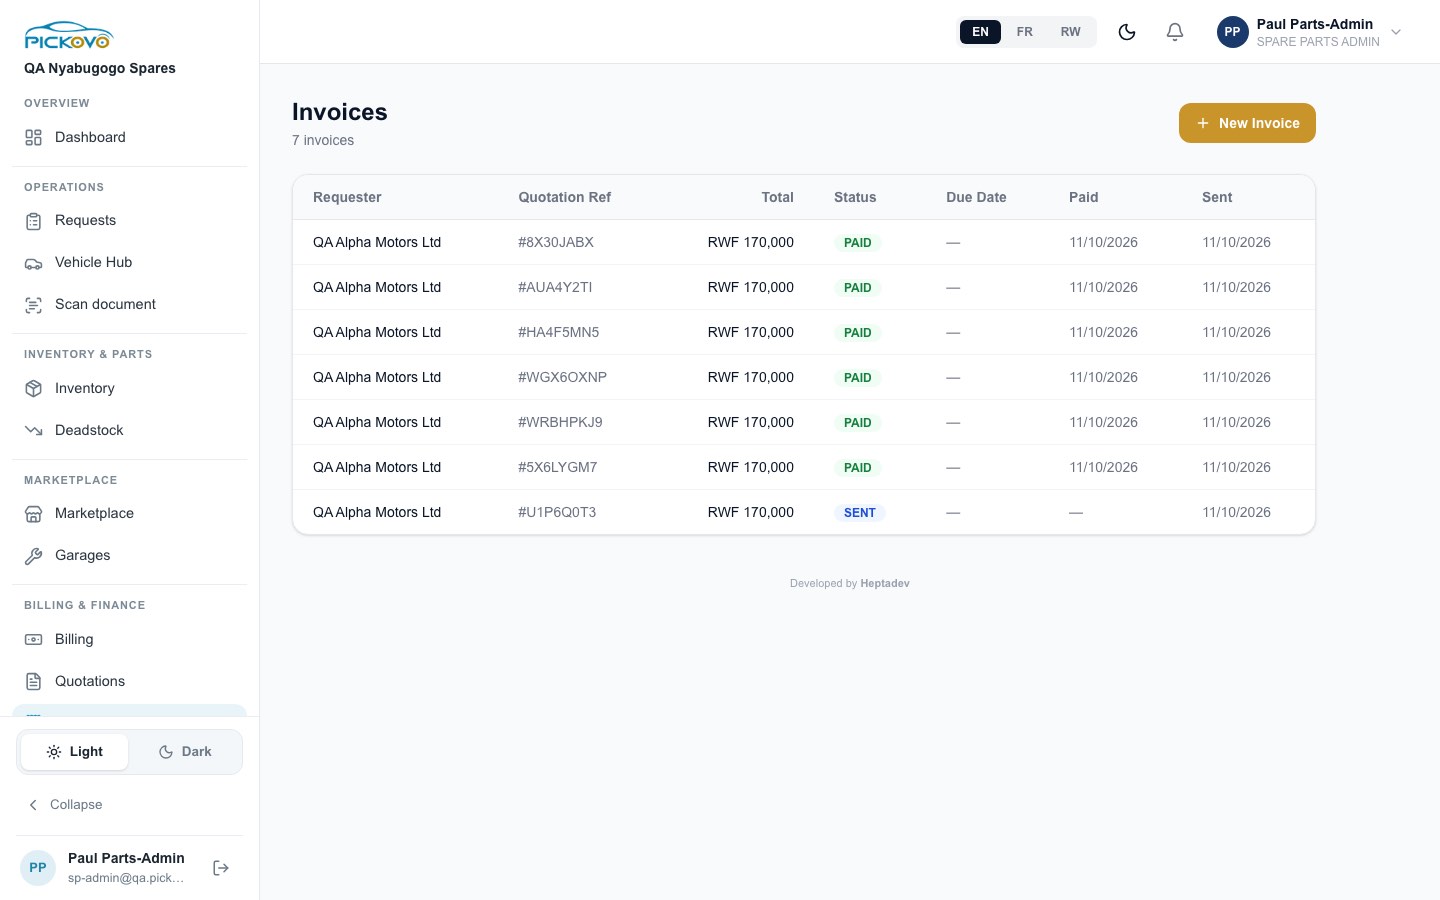
Figure 10: Invoices: requester, quotation reference, total, status, due date, paid date and sent date.
Create an invoice: select + New Invoice and choose either:
- From Quotation, "Convert an accepted quotation into an invoice". Search by reference or customer and pick an accepted (or sent) quotation. If it was only sent, it is marked accepted.
- Direct Invoice, "Create a custom invoice from scratch". Enter Customer Details and the Items (pick from the catalogue, scan a barcode or type them in), plus Currency, Discount %, Tax %, Due Date and Notes, then select Create Invoice. The form shows each catalogue item's stock and highlights a line whose quantity is more than you hold.
When an invoice is created, stock for every catalogue-linked line is taken off straight away. This is recorded as a Stock Out with the invoice number (Figure 4). A quotation can be invoiced only once.
Click a row to open the invoice.
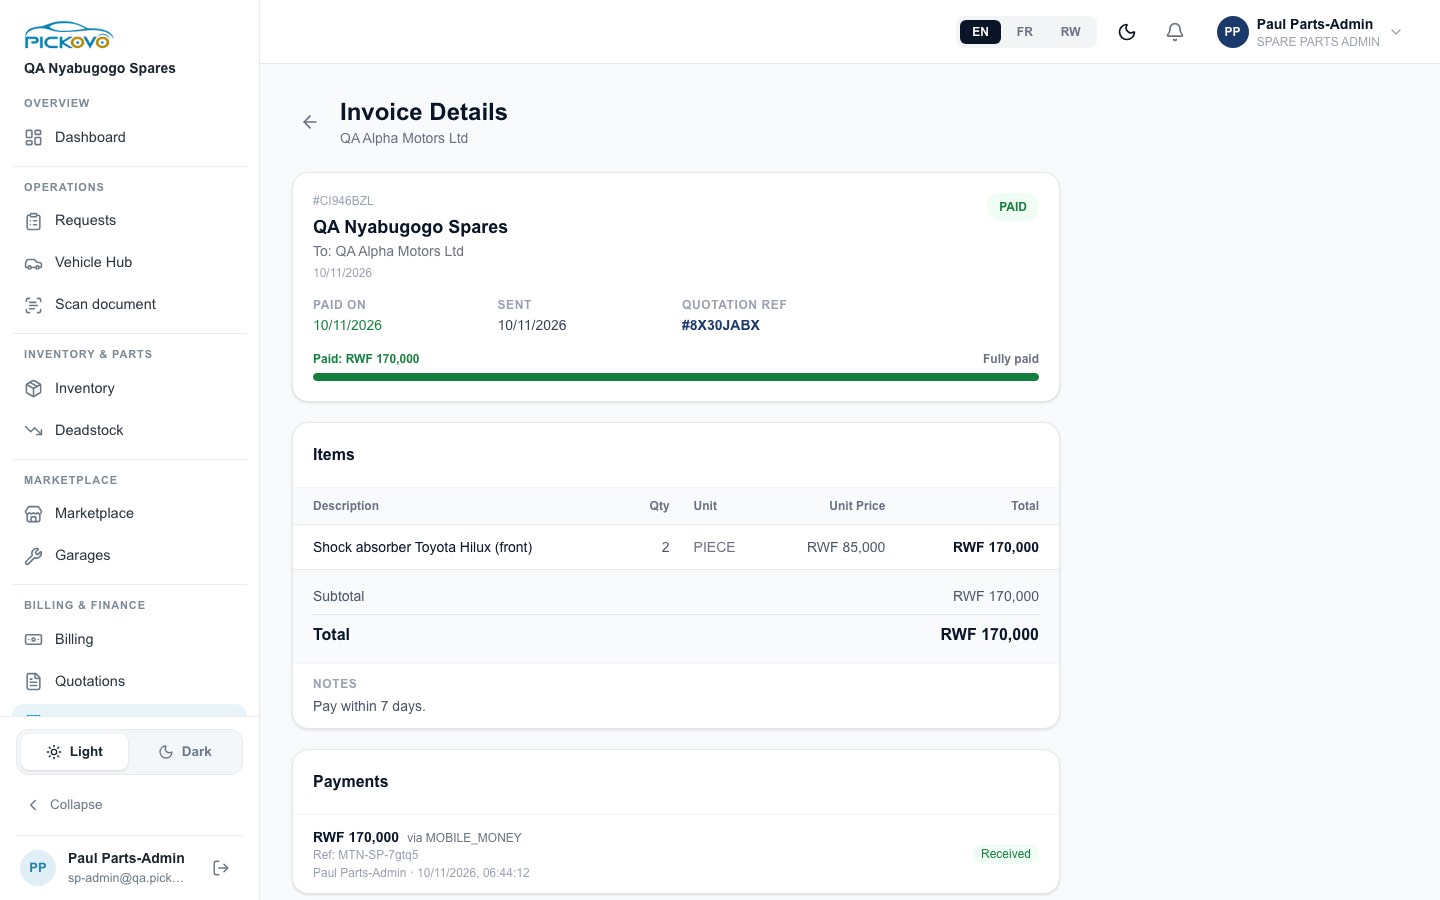
Figure 11: A fully paid invoice: paid-on, sent and quotation reference, the payment progress bar, items, totals and the recorded mobile-money payment.
Buttons on an invoice
| Button | What it does |
|---|---|
| Mark as Sent | Sends the invoice to the buyer (status SENT). Shown until sent. |
| Record Payment | Opens a form with Amount *, Payment Method (Cash, Mobile Money, Bank Transfer, Card, Cheque, Other) and Reference (optional) (e.g. transaction ID or cheque number), then Record. |
| Share | WhatsApp, email, copy, or print. |
| Prints the invoice. |
- You can record part payments. A progress bar shows how much has been paid. When the payments reach the total, the invoice becomes PAID and the paid date is set.
- A payment larger than the outstanding balance is refused ("Cannot exceed balance of …").
- Only your shop sets an invoice's status. The buyer can see your invoice on their side, but cannot mark it paid or change it.
- Recording a payment here records money you have already received. It does not collect money from the buyer.
C.7 Marketplace inbox (collaborations)
Purpose: manage which garages and fleet companies have a working relationship with your shop.
Open Marketplace in the sidebar.
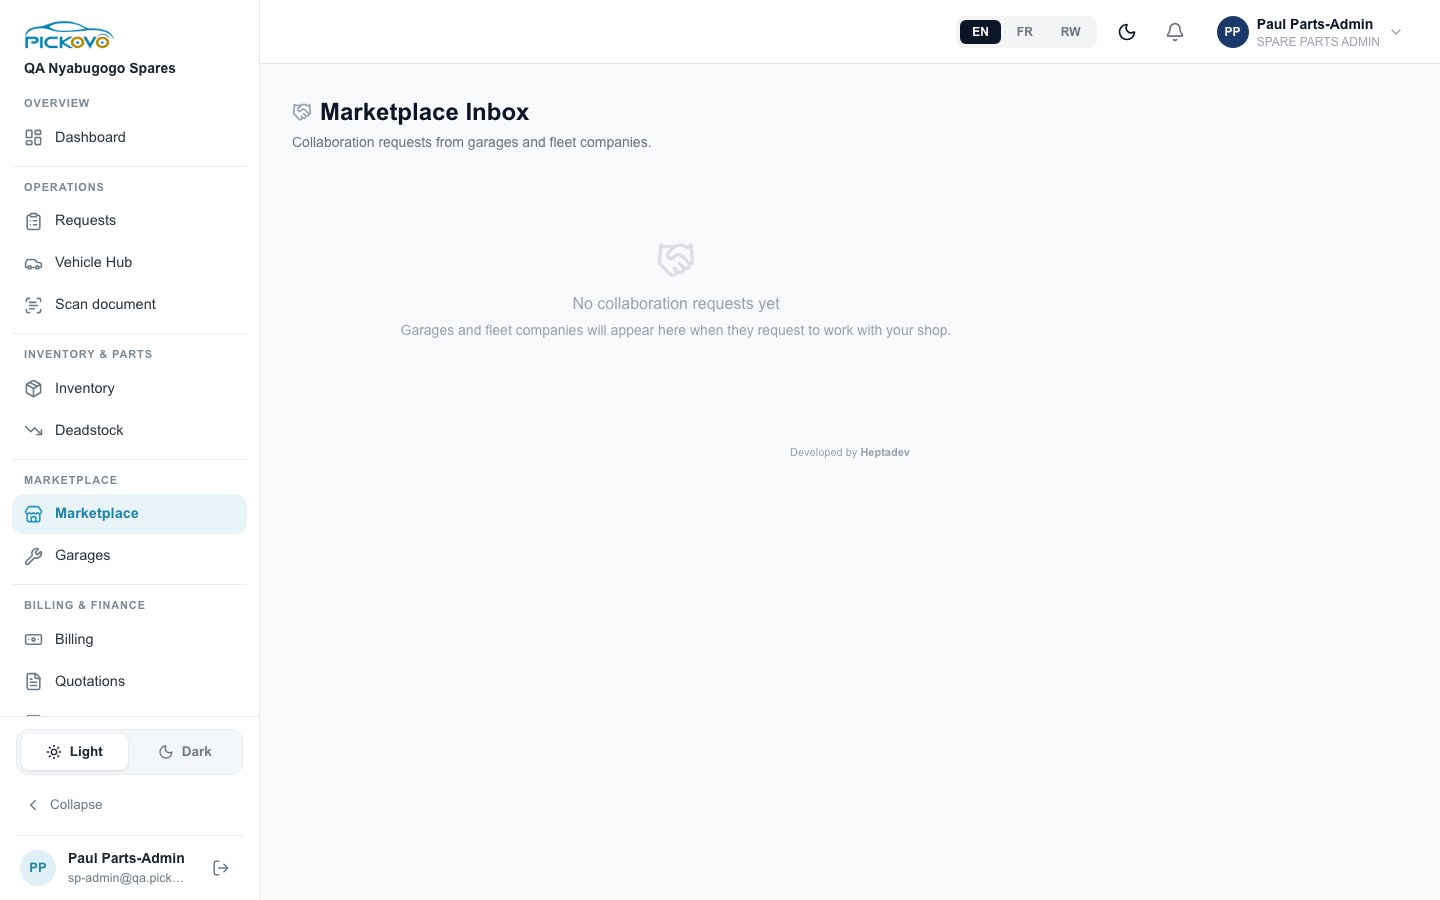
Figure 12: The Marketplace Inbox, here with no collaboration requests yet.
When a garage or fleet company asks to work with your shop, the request appears here. Pending requests are listed first, then answered ones.
- Expand a request to read and send Messages ("Send a message…").
- Select Accept or Reject. The requester is notified of your answer.
You need a connection to respond. Accepting and rejecting depend on your plan including the spare-parts inventory feature.
C.8 Garages
Purpose: find garages and invite them to collaborate with your shop.
Open Garages.
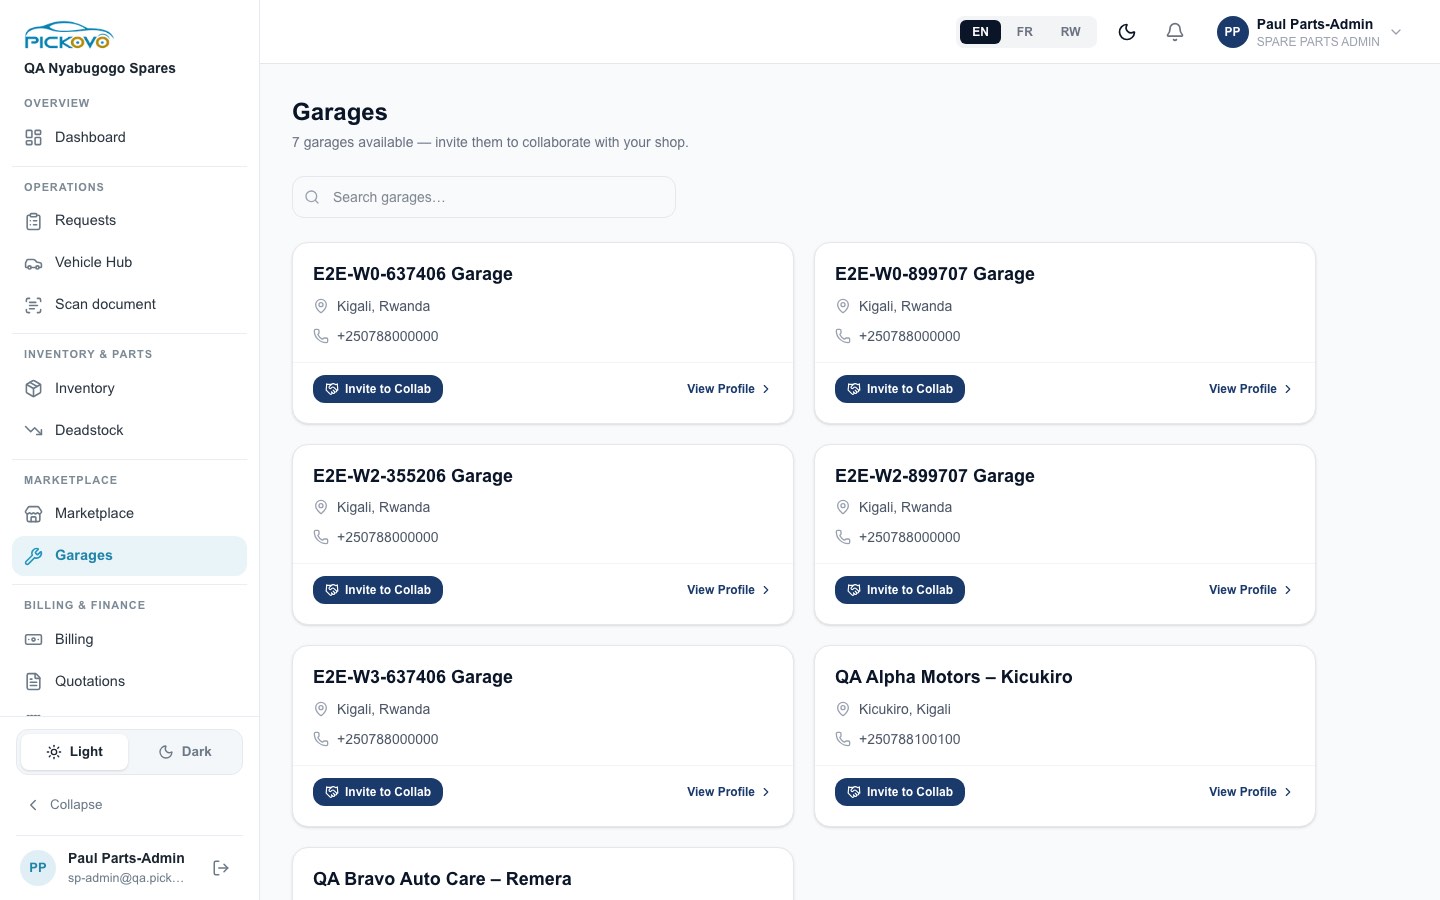
Figure 13: Garages: a searchable list of active garages with location, phone, Invite to Collab and View Profile.
- Use Search garages… to find a garage.
- Select Invite to Collab to send an invitation. The card then shows the invitation as pending. If a garage rejected you earlier, the button reads Re-invite.
- View Profile opens the garage's profile: details, specialisations and reviews, plus a Collaboration panel. There you can send an invitation with an optional message, and exchange messages once an invitation exists.
You cannot invite a garage that belongs to your own organisation.
C.9 Expenses
Purpose: track your shop's running costs.
Open Expenses.
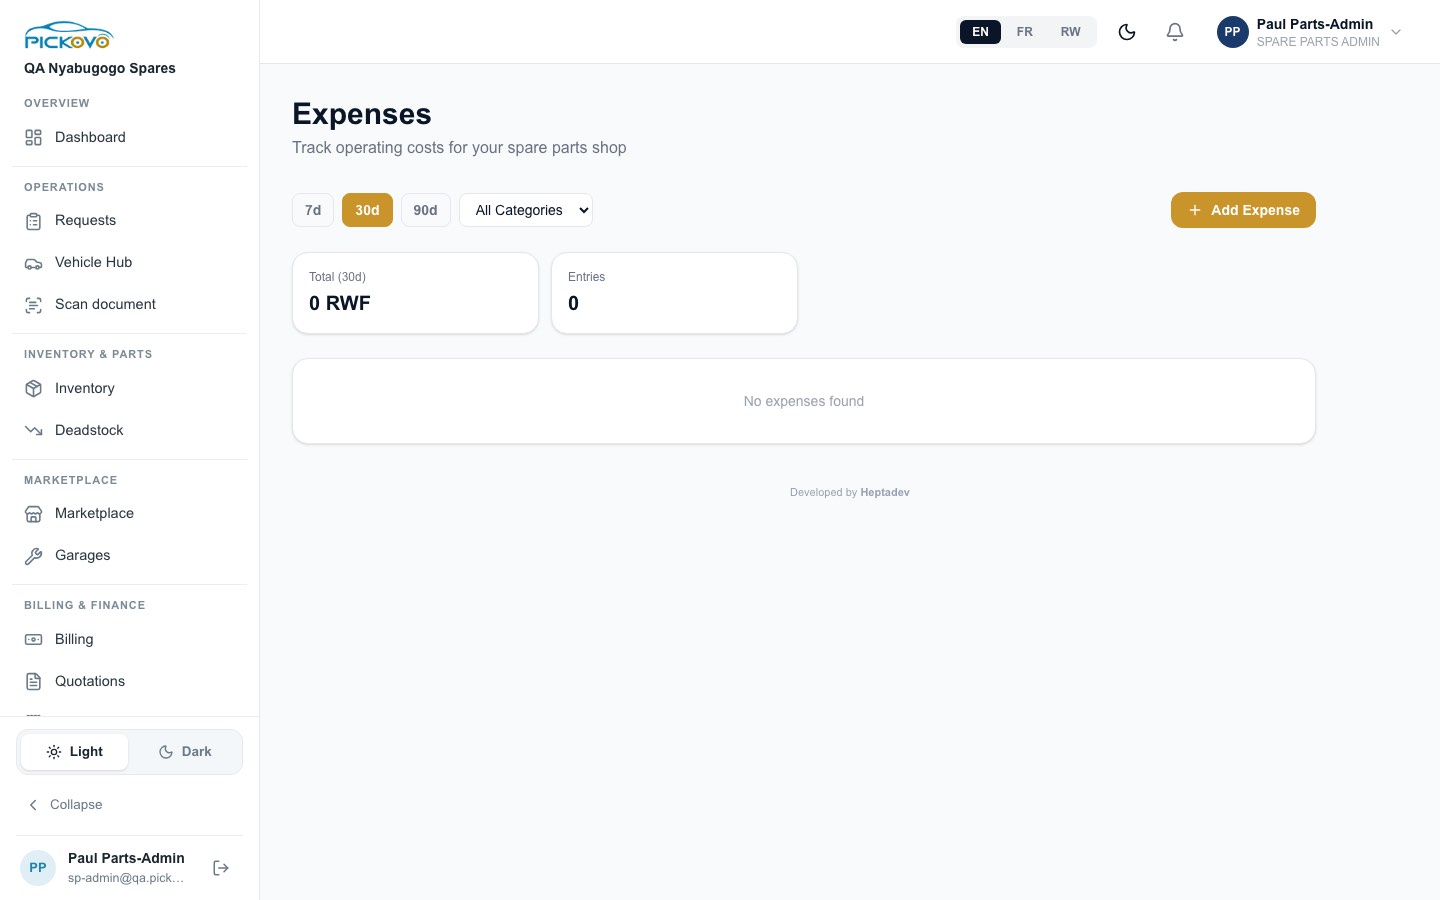
Figure 14: Expenses: period buttons, category filter, totals and the expense list (empty here).
- Choose a period (7d, 30d, 90d) and optionally a category.
- Select + Add Expense and fill in Description * (e.g. "Office rent – March"), Amount *, Currency, Category, Date * and Notes. Then select Add.
- The Total and Entries cards and the Breakdown by category update. To remove an entry, use its delete button and confirm "Delete this expense?".
Categories: Rent, Utilities, Fuel, Salaries, Equipment, Tools, Supplies, Maintenance, Insurance, Marketing, Other.
C.10 Billing (your Pickovo subscription)
Purpose: choose and pay for your Pickovo plan.
Open Billing.
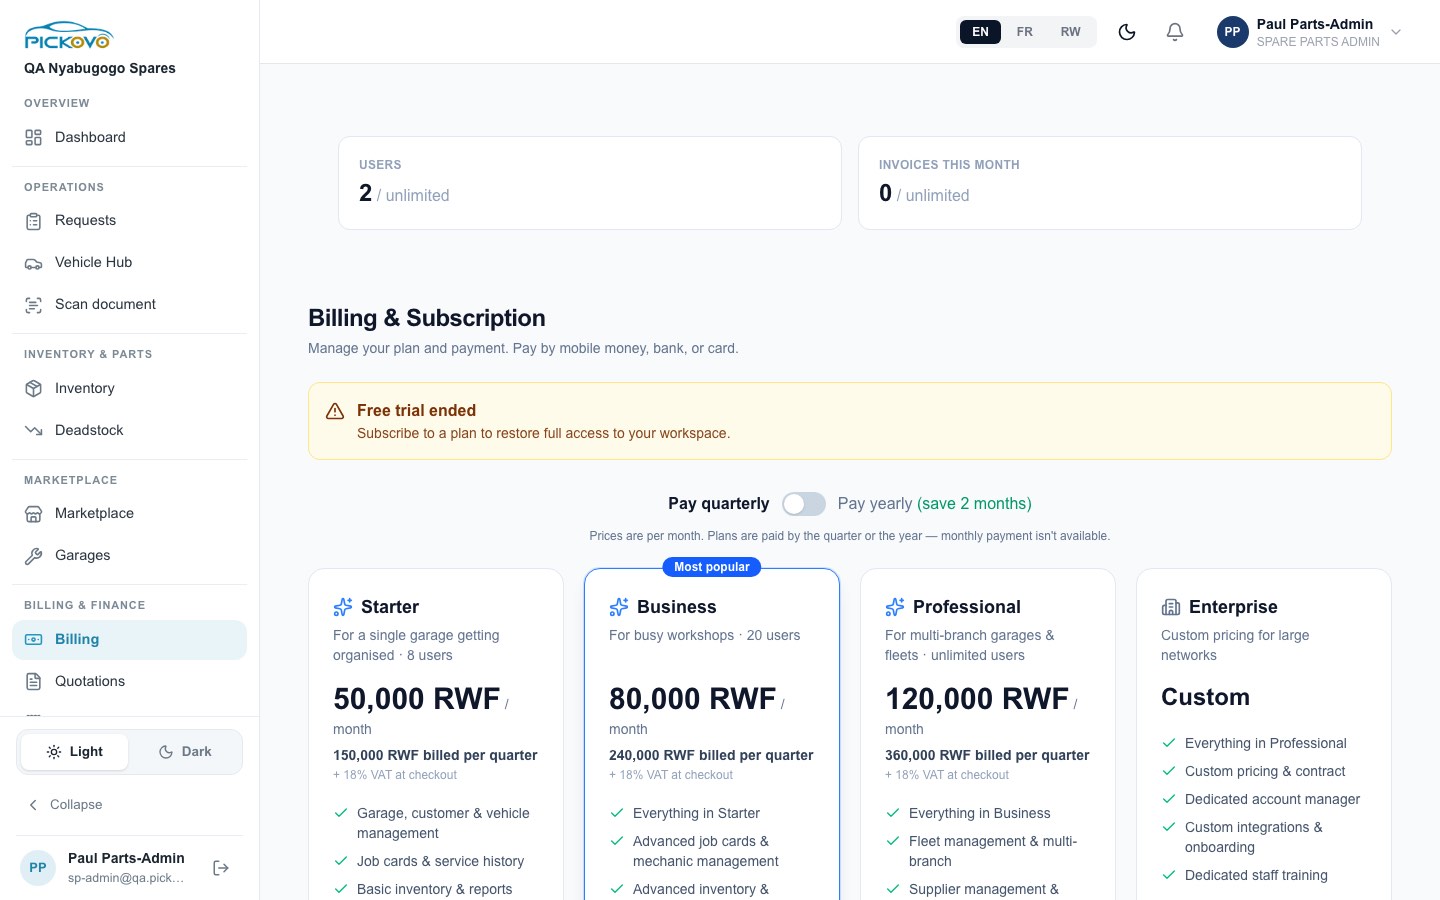
Figure 15: Billing & Subscription: usage counters, the trial status banner, the quarterly/yearly switch and the plans.
- The top cards show your usage, for example Users and Invoices this month, against your plan's limits.
- A banner shows your trial or subscription status, for example "Free trial ended, Subscribe to a plan to restore full access to your workspace."
- Plans are paid by the quarter or the year (the yearly switch saves two months). Monthly payment is not offered. Prices exclude 18% VAT, which is added at checkout.
- Choose a plan and pay by mobile money (approve the payment on your phone), bank transfer or card. Which methods work depends on the payment providers configured for Pickovo. For a bank transfer, enter your reference so the payment can be matched.
- Further down the page you will find your payment history, a subscription timeline and a data-export card.
C.11 Activity Log
Purpose: see who did what in your organisation.
Open Activity Log in the sidebar.
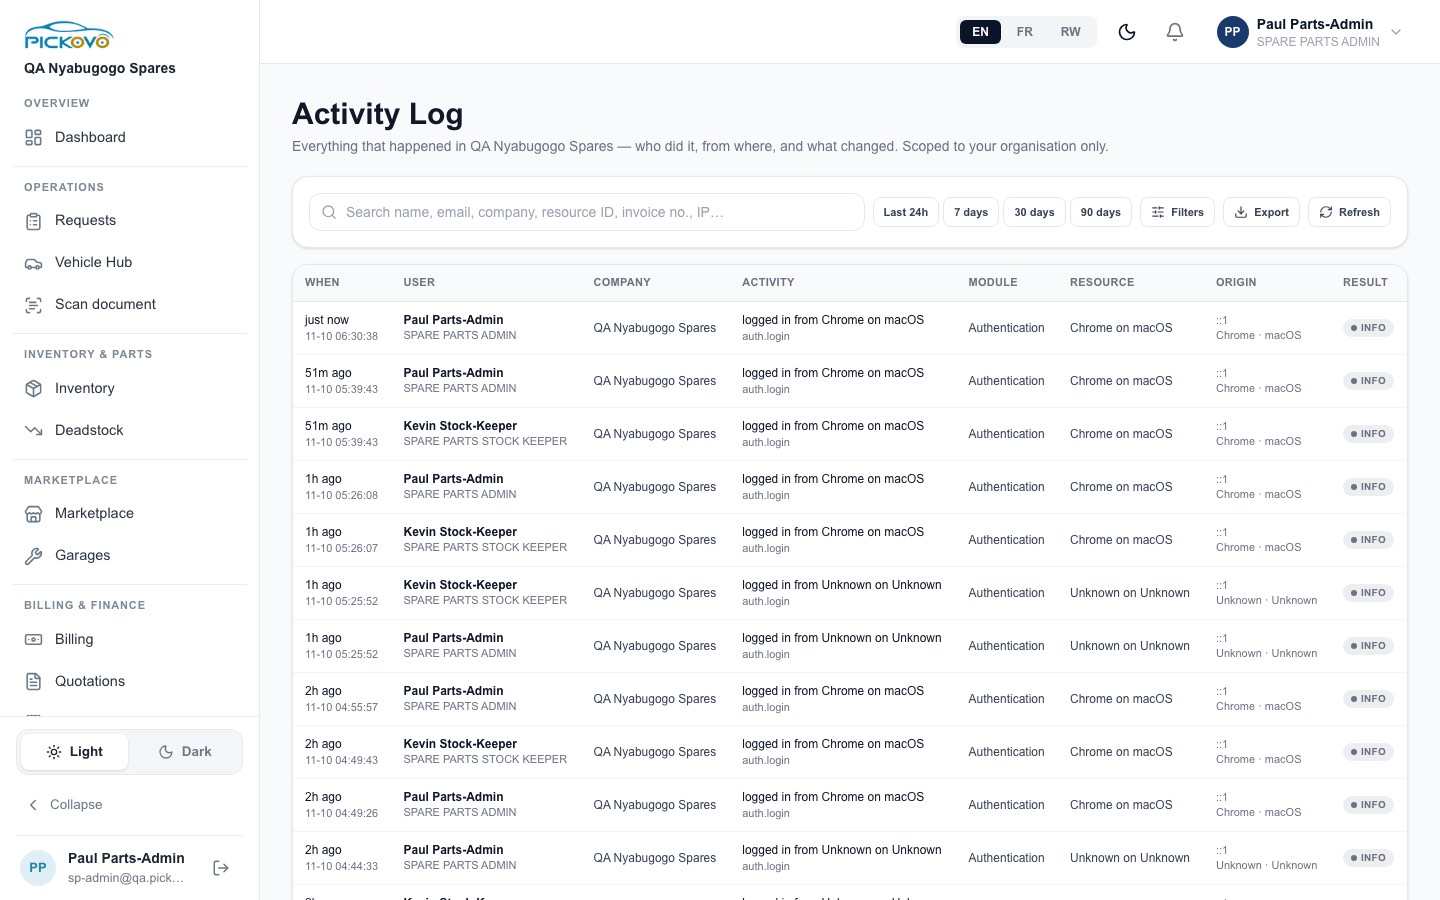
Figure 16: The Activity Log for QA Nyabugogo Spares: sign-ins by the admin and the stock keeper, with time, user, activity, module, resource, origin and result.
- Search by name, email, company, resource ID, invoice number or IP address.
- Time ranges: Last 24h, 7 days, 30 days, 90 days. Filters narrows the list further.
- Export downloads the current view (CSV, JSON, Excel or PDF). Refresh reloads it.
- The log covers your organisation only.
C.12 Shop Settings (profile, team, photos)
Purpose: keep your shop's details current and manage your staff accounts.
Open Settings in the sidebar.
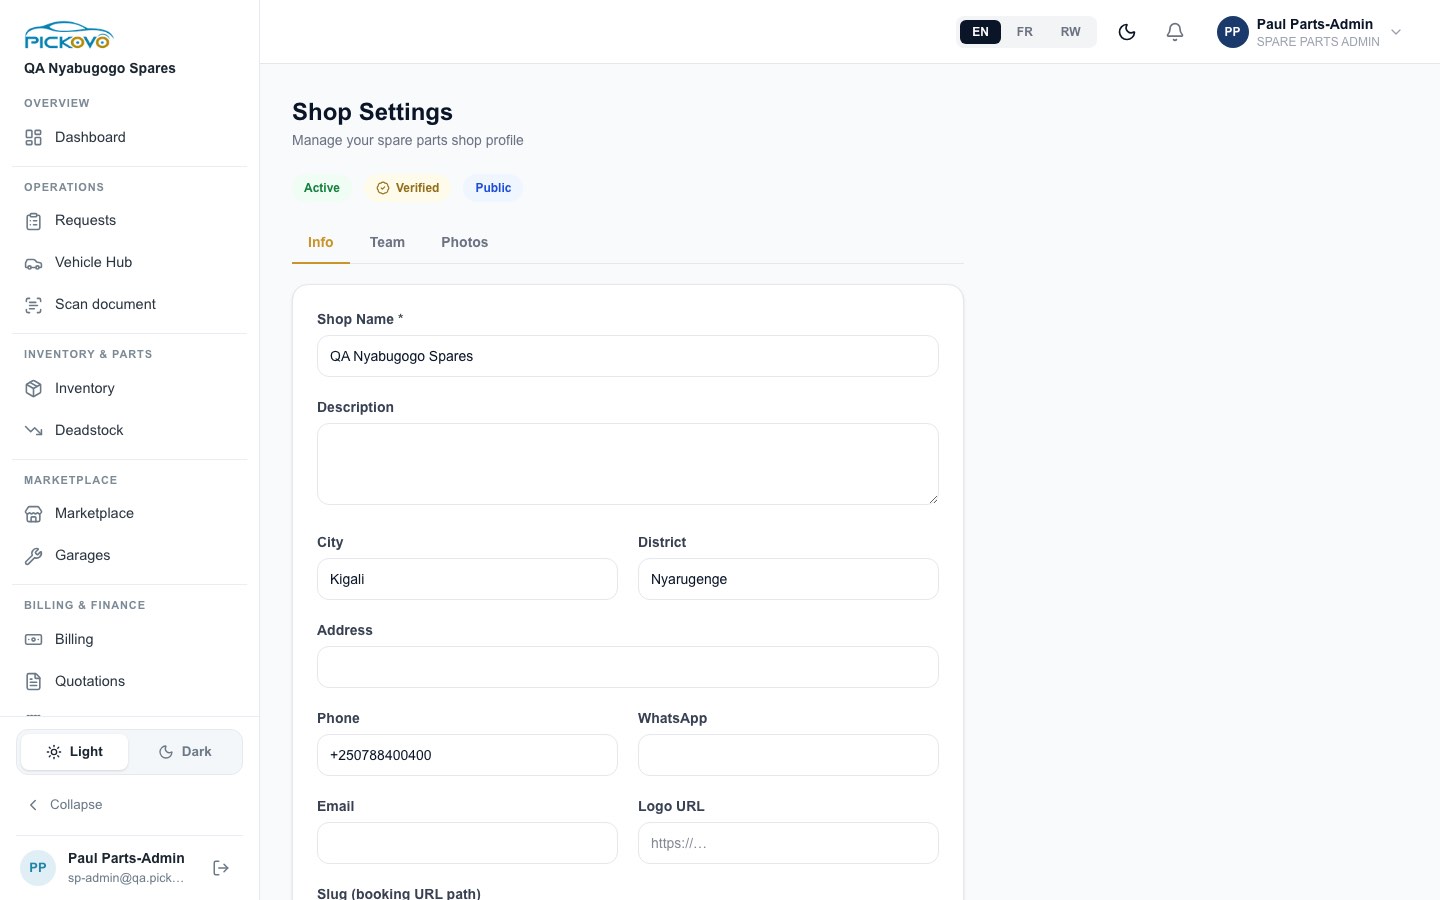
Figure 17: Shop Settings: status badges (Active, Verified, Public) and the Info tab.
Info tab: Shop Name *, Description, City, District, Address, Phone, WhatsApp, Email, Logo URL and Slug (booking URL path). Below them are two switches, Public listing and VIP shop, which set the badges at the top of the page. Select Save Settings to save.
Team tab: your shop's staff, with role and Active/Inactive status.
- Select Add Stock Keeper.
- Enter Name *, Email, Phone and Password *. The password needs at least 8 characters, with an upper-case letter, a lower-case letter, a number and a symbol.
- Choose Role *: Stock Keeper or Admin.
- Select Create. Give the person their sign-in details privately.
On each staff row you can switch the account between active and inactive, or remove it (confirm "Remove this staff member?"). Deactivate people who leave, straight away.
Photos tab: paste image URLs (Paste image URL…) and select Save Photos.
At the bottom, Request account deletion opens Pickovo's account-deletion request page. Your identity is confirmed by email before anything is deleted.
C.13 Notification preferences
Purpose: choose how you are told about events.
Open https://fleet.heptadev.com/en/settings/notifications (there is no menu link yet).
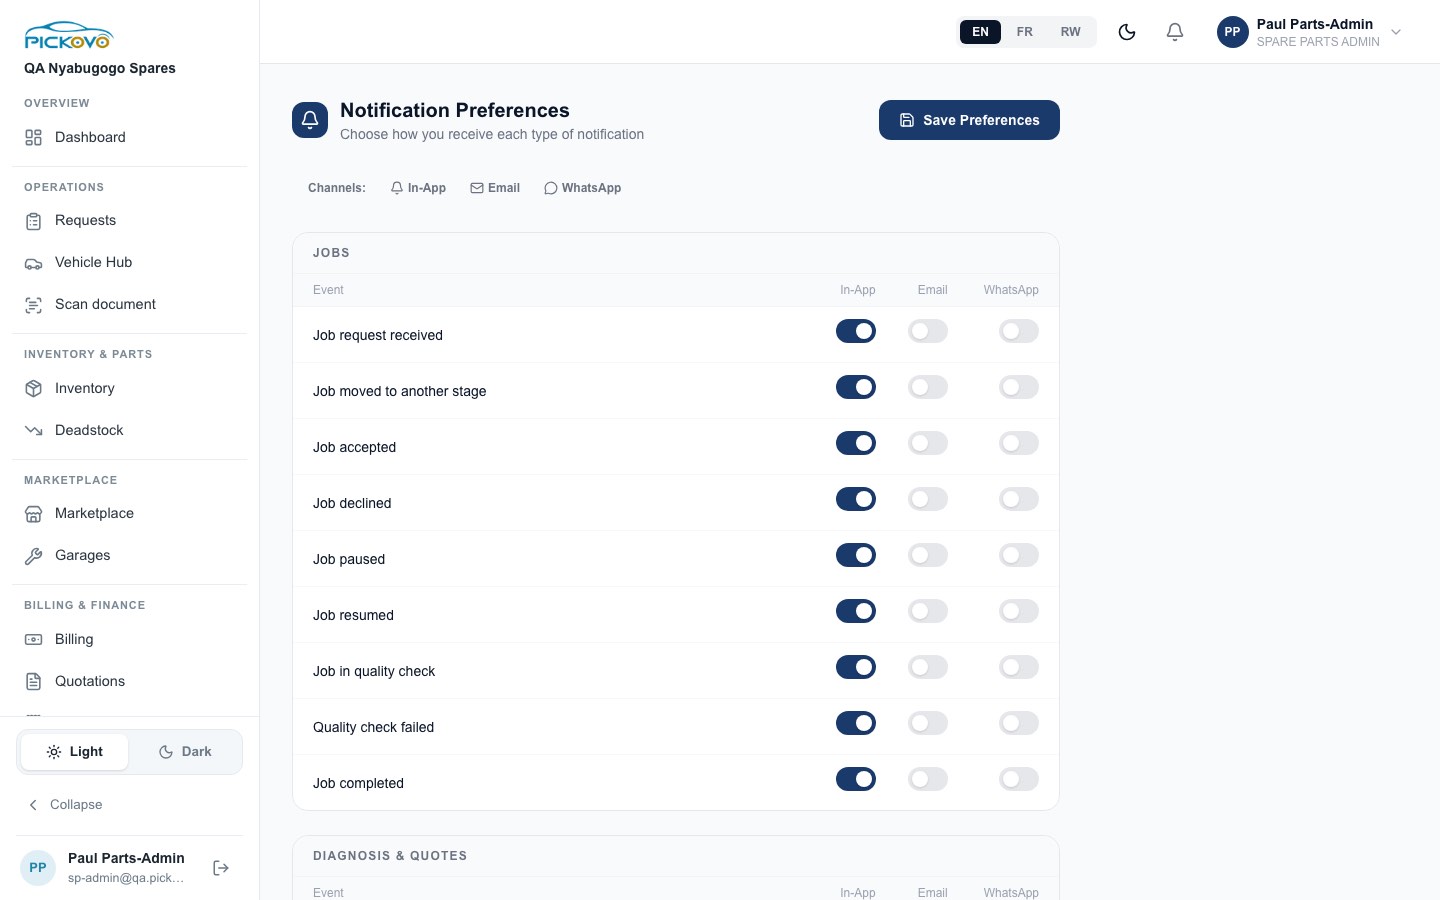
Figure 18: Notification Preferences: one row per event, with In-App, Email and WhatsApp switches.
Each event has switches for In-App, Email and WhatsApp. Events are grouped under Jobs, Diagnosis & Quotes, Invoices, Maintenance & Issues, Inventory & Compliance and Marketplace. Not all of them apply to a shop. The ones that matter most to you are Low stock alert, New collaboration request and Collaboration request answered. Select Save Preferences.
Your notifications themselves are under the bell in the top bar.
C.14 Refer & Earn
Purpose: invite other businesses and earn free subscription time.
Open Refer & Earn.
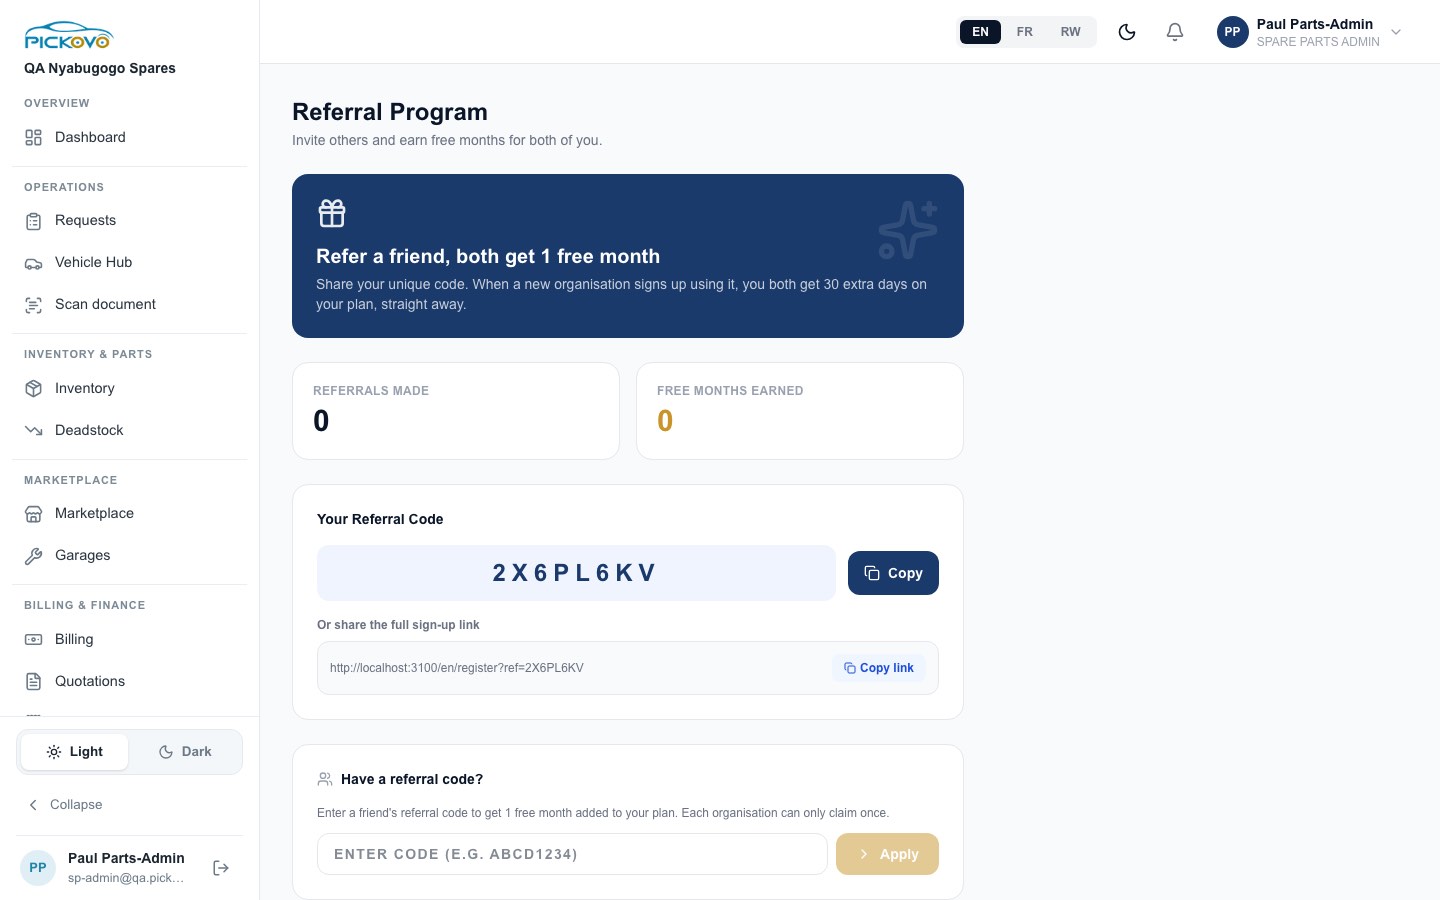
Figure 19: The Referral Program: counters, your referral code with Copy, the sign-up link with Copy link, and the box for entering someone else's code.
- Share Your Referral Code (Copy) or the full sign-up link (Copy link). The link uses the address of the site you are on. When a new organisation signs up with it, you both get 30 extra days on your plan.
- Referrals made and Free months earned show your results.
- Have a referral code? Enter a friend's code and select Apply. Each organisation can claim once.
C.15 Your personal settings
Purpose: change your own name, contact details and password.
Open https://fleet.heptadev.com/en/settings.
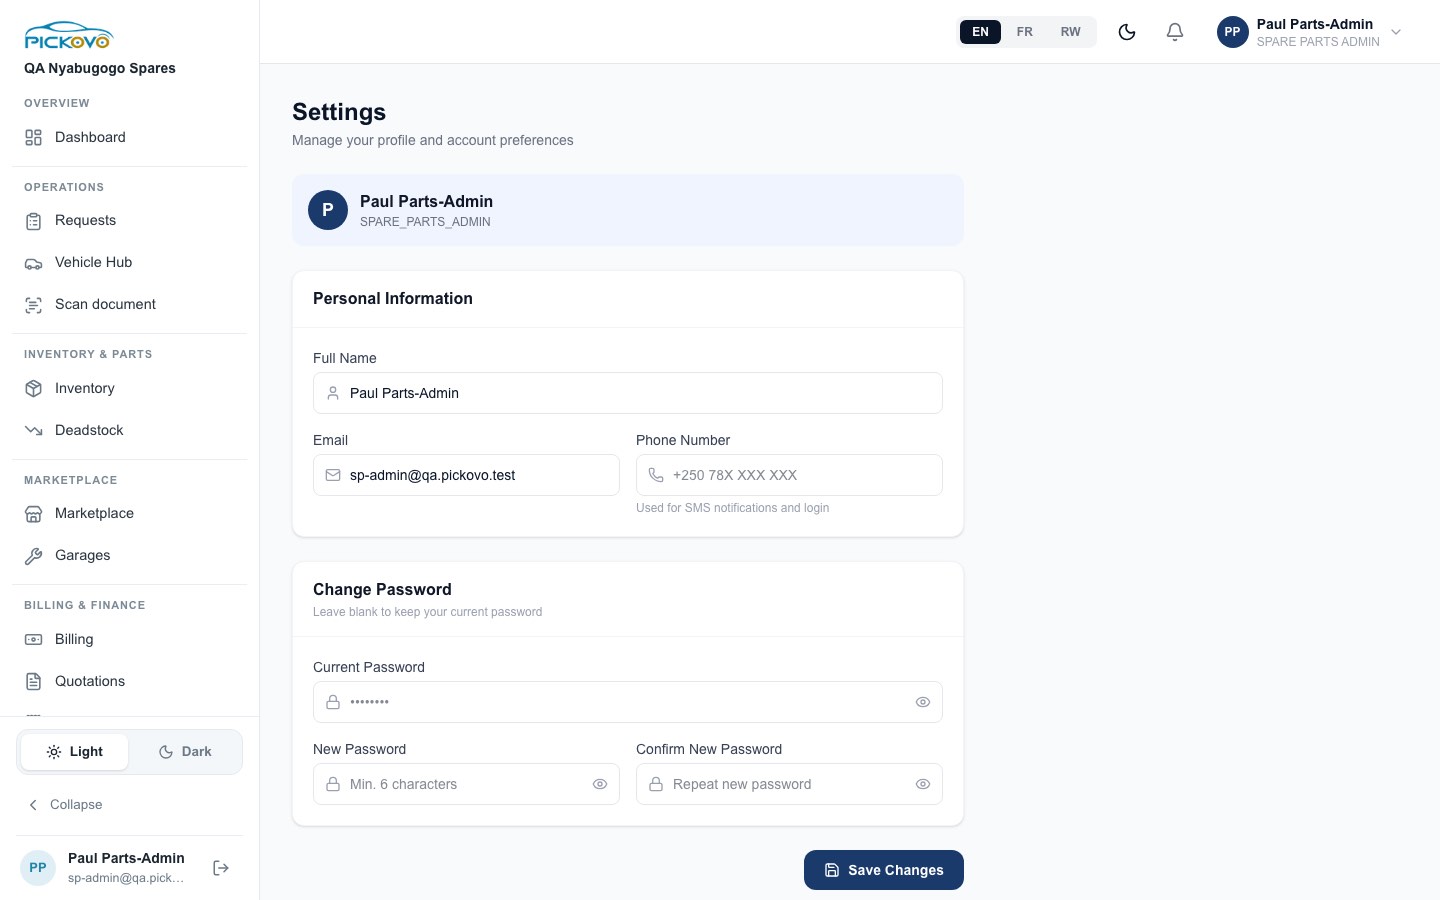
Figure 20: Settings: Personal Information and Change Password.
- Update Full Name, Email or Phone Number. Your phone is used for SMS notifications and for signing in.
- To change your password, enter your Current Password, then your New Password twice, and select Save Changes. Leave the password fields blank to keep your current password. The hint says "Min. 6 characters", but a new password is only accepted with at least 8 characters, an upper-case letter, a lower-case letter, a number and a symbol.
An email address or phone number already used by another account is refused.
D. What you can and cannot do
Based on the measured access matrix (sections 5.2 and 5.6 of the audit, column SPA) and the code.
| Area | View | Create | Edit | Delete | Approve / set status |
|---|---|---|---|---|---|
| Dashboard | Yes | - | - | - | - |
| Inventory items and locations | Yes | Yes | Yes | , (no delete button; edit or let stock run down) | - |
| Stock movements (in / out / return) | Yes | Yes | - | - | - |
| Deadstock thresholds and clearance prices | Yes | - | Yes | - | - |
| Requests from buyers | Yes | , (buyers create them) | - | - | Answer with a quotation |
| Quotations | Yes | Yes | - | - | Yes send, approve, reject |
| Invoices and payments | Yes | Yes | - | - | Yes only the shop sets status |
| Collaborations (Marketplace inbox) | Yes | Invite garages | - | - | Yes accept / reject |
| Expenses | Yes | Yes | - | Yes | - |
| Shop profile, photos | Yes | - | Yes | - | - |
| Staff (stock keepers, admins) | Yes | Yes | Yes activate / deactivate | Yes | - |
| Billing / subscription | Yes | Yes pay | - | - | - |
| Activity Log | Yes | - | - | - | - |
| Notifications, preferences, referral, personal settings | Yes | - | Yes | - | - |
Cannot access: the garage, fleet, driver, transport-authority, regulatory and superadmin workspaces, and Settings → AI (/settings/ai). If you open any of these addresses you are sent back to your own dashboard or to the sign-in page.
E. Common workflows
Workflow 1: From a garage's request to a paid invoice (W4)
This is the supplier flow that was tested end to end on staging.
- You: make sure the part is in Inventory with a price and stock (C.1). In the test: "Shock absorber Toyota Hilux (front)", RWF 85,000, 8 in stock.
- The garage: finds your shop in its Spare Parts marketplace and sends a request ("2 PIECE … For RAD 102 Q – Land Cruiser front suspension"). It appears in your Requests as PENDING.
- You: open the request and select Create Quotation. Check the lines, add a note such as "Delivery to Kicukiro tomorrow morning", and select Create Quotation. The request becomes QUOTED.
- You: on the quotation, select Mark as Sent. The status becomes SENT.
- The garage: accepts the quotation from its side. The status becomes ACCEPTED. If the customer accepts by phone instead, you can select Approve.
- You: go to Invoices → + New Invoice → From Quotation and pick the quotation. The invoice is created, and 2 pieces are taken off your stock (8 → 6). The movement appears in Stock Movements with the invoice number.
- You: select Mark as Sent. The garage can now see your invoice.
- You: when the money arrives, select Record Payment: amount RWF 170,000, method Mobile Money, reference "MTN-SP-…". The invoice becomes PAID.
Workflow 2: Receive a delivery from your own supplier
- Open Inventory and find the item, or use the QR icon to scan its barcode.
- Select In, enter the quantity received and the unit cost, and note the delivery reference.
- Confirm. The quantity rises, and the movement is listed under Movements as Stock In.
- If the part is new to your shop, use + Add Item with an Initial Quantity instead.
Workflow 3: Free up money tied in old stock
- Open Deadstock and filter Deadstock or Slow-moving.
- Sort out what to clear. For each item, select Clearance, adjust the suggested price and select Apply.
- If your shop's turnover is slower or faster than average, use Thresholds to change the 30/90-day limits.
Workflow 4: Add a stock keeper
- Open Settings → Team and select Add Stock Keeper.
- Enter the person's name, email or phone, and a strong temporary password. Choose Stock Keeper and select Create.
- Tell them to sign in at fleet.heptadev.com and change their password at
/en/settings. - When they leave, switch their account to inactive or remove it.
F. Troubleshooting
| Problem | Cause and fix |
|---|---|
| "Sign-in paused" or sign-in keeps failing after many tries | After 10 wrong passwords in 15 minutes, sign-in for that account is paused. Wait 15 minutes or use Forgot password?. |
| You are sent back to your dashboard or the sign-in page when opening a link | The page belongs to another workspace or role (for example a garage page or /settings/ai). This is expected. |
| A banner says your free trial has ended, or an action is refused because of your plan | Your subscription has lapsed, or the feature (deadstock, spare-parts inventory, AI scanner) is not in your plan. Go to Billing. |
| Create Quotation does not appear on a request | Quotations can be created only while the request is PENDING, and only once. If a quotation exists, use View Quotation. |
| Convert to Invoice is missing | The quotation must be ACCEPTED and not already invoiced. Send it and wait for the buyer, or select Approve if they agreed another way. |
| "Invoice already exists for this quotation" | Each quotation can be invoiced once. Open the existing invoice from Invoices. |
| Stock did not go down after invoicing | The invoice lines were not linked to catalogue items. This happens with free-text lines, and on the current build with Convert to Invoice on the quotation page. Record a Stock Out with the invoice number in the notes. In future, use From Quotation on the Invoices page. |
| "Insufficient stock. Available: …" | You tried to take out more than you hold. Check the location and the quantity. |
| "Cannot exceed balance of …" when recording a payment | The amount is more than what is still owed. Enter the outstanding balance or less. |
| Re-classify on Deadstock does nothing | Known issue. Classification still runs automatically every day if it is enabled under Thresholds. |
| In / Out / Return buttons or Accept / Reject are missing | You are offline. Reconnect; these actions need the internet. |
| A new staff member's password is refused | It needs at least 8 characters, with upper- and lower-case letters, a number and a symbol. |
| A team member cannot see Quotations or Invoices | Stock keepers have no access to pricing, quotations, invoices, marketplace, expenses or billing. Give them the Admin role only if they should handle money. |
G. Security and best practices
- Protect your sign-in. Use a long, unique password and never share your account. Create a separate account for each staff member. The Activity Log then shows who did what.
- Two-factor authentication: if it is already on for your account, keep your authenticator app safe. The screen to switch it on is not yet in the spare-parts workspace. Ask Pickovo support if you need it.
- Give the smallest role that works. Most staff only need Stock Keeper. Keep Admin for people who quote, invoice or take payments.
- Switch off leavers straight away under Settings → Team, and check the Activity Log from time to time for unexpected sign-ins.
- Record payments only when the money has actually arrived, and always enter the mobile-money or bank reference. Your invoice statuses are the official record for your buyers.
- Keep stock honest. Record every delivery and every return, and check Stock Movements against your shelves regularly.
- Log out on shared computers.
- Pickovo only shows your shop's data to your own staff. A buyer sees only the requests, quotations and invoices that concern them.